Tuesday, December 28, 2010

Onion Mushroom Quiche with Wheat Crust

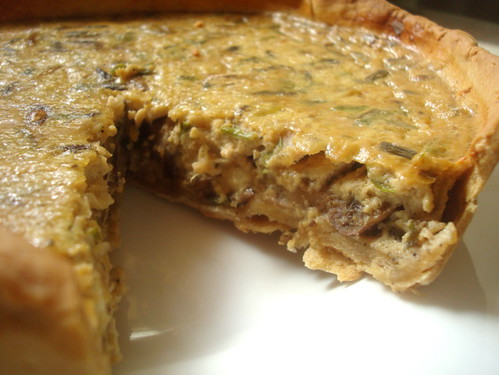
Quiche is a baked dish of French Cuisine. It has a crust as the base and the filling made with milk, eggs and cheese is baked over the crust. This could be the introduction, that i can give you based on wiki. but my definition to it is, Quiche will taste like a Rich Egg Omelette. Yes The filling in the quiche normally has eggs, milk and cheese which gives the omelette taste. But this Onion Mushroom Quiche Tasted the best, with spring onions in it. the butter infused mushroom, onions and spring onions makes this Onion Mushroom quiche an Unbeatable One.

Mushroom Quiche

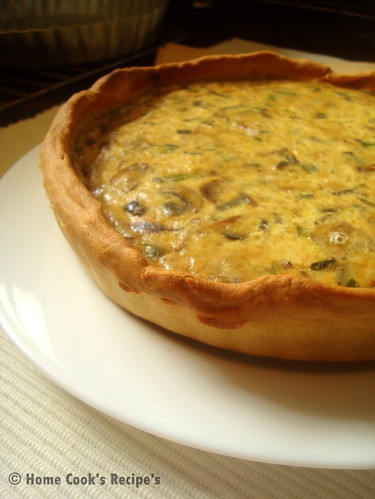
Quiche, somehow i got fascinated by the name and the way it looked. and it leaded me to try my hands on it six months back. but i made the pie crust with wheat flour, which came out crispier and without any guilt, we were able to eat the quiche. Last Weekend, i decided to prepare the Mushroom Quiche with All Purpose Flour/Maida, and it came out as per its law. very flaky and acted as a soft base to mushroom filling. But I like the Wheat Crust, which was crisp and nice. and so you see me blogging this quiche after 6 months.

Ingredients for the Wheat Crust:

Wheat Flour - 2 cup's + 2 tbsp(for dusting)
Cold Butter - 100 gms
Salt - a pinch
Baking Powder - 1/4 tsp
Ice water - 1/2 cup

Quiche


How to Prepare the Crust/ Pie Shell?

Have Wheat flour in a wide bowl. Add salt and baking powder to the wheat flour and mix well. Slice the cold butter into thin slices. add to the wheat flour and mix well, so that all looks like Bread Crumbs. After that add chilled water and mix all the flour together to form a dough. Basic rule here is to not knead the dough too much, because kneading may reduce the gluten content in the dough. hence you wont get any flaky crust. After kneading them to a pilable dough, wrap the dough with a cling film and refrigerate for atleast 30min to 2 hrs. Just before baking the pie crust, remove them from fridge and let it sit at room temperature for 5-10 mins.

Pre-Heat the Oven at 180C. Roll the Crust Dough by dusting some flour. roll them out evenly. then line it over the Tart Pan. Leave enough heights for the shell, as it may shrink after baking. Trim the extra dough with a kitchen scissor. Line the Shell with a aluminium foil sheet. add uncooked rice or some Rajma or Chickpeas to give some weight over the shell, so that the crust dont raise, while baking and hence it gets evenly baked.

Bake the Pie crust for about 12-15 minutes at 250C in the bottom wrack of the oven. after baking the crust to golden colour, remove the foil sheet with the rice or some pulses carefully. let the pie shell rest in wire wrack.

Ingredients for the Filling:

Mushroom - 200 gms
Onions - 2
Spring Onions (Green Part) - 1 cup (chopped)

Butter - 2 tbsp
Pepper Powder - 1 tsp
Salt to taste

Eggs- 3
Milk - 1 cup
Cheese - 2 tbsp grated [Mozarella or Cheddar cheese]

* I added comparitively less cheese, but usually the recipe will call for atleast 1/4 of cheese.

Quiche

How to Prepare the Filling?

Heat Butter in a Pan, add chopped onion and fry it. then add chopped mushroom and spring onions and saute them along. add salt to taste and pepper powder and give a mix. Reduce the flame and close the pan with its lid and let it rest in slow flame for about 5 minutes. This is to make the mushroom mix absorb the flavour of butter.

Beat the Eggs and add 1 cup of milk to it and mix well. also add cheese and give a mix.

Assembling the filling over the piw crust:

Take the Baked Pie crsut and layer it with the onion mushroom mix. then add milk+egg filling over the mushroom's. Now carefully transfer to the oven's middle wrack and bake the Quiche at 180C for about 40 mins.

After 40 minutes, insert a toothpick in the centre of the quiche and check whether it comes out clean, to know, its fully baked. if its not baked, bake it for another 5 minutes.

After baking, remove them from oven and let it rest for 5 mins and them remove the quiche from tha tart pan, to serve.

Sunday, December 26, 2010

Baingan aur Mirch ka Saalan

Life has so many challenges ahead for us now. Right from Career, School for the kid,  everything is still on hold, and we are really fighting hard to play it all smoothly from the pause mode. Hope everything will get smoother. Other than that, had bloggers meet, where i got a chance of knowing all nice bloggers and now i can call them as blog-friends. every blog-friend were so sweet and nice. then my kid got holiday's, so i need not tell you all, why i was not spotted here often.

Baingan aur Mirch ka Saalan

Holiday fever caught us and cooking new dishes becomes my job. As a Brinjal Fan, i was longing to prepare this Baingan aur Mirch ka Saalan. i got this recipe from Nita Mehta's Cook in Minutes. it was really made in minutes.close to quarter of an hour, if i need to mention the duration.

If you think, that this Gravy is a Spicy Dish, then you are wrong. Its Tangy and Thick Gravy. If you need it to be spicier, add some chilli powder or have a bite of green chilli's then and there while having the gravy;)
The fried soft brinjals compliment with the tanginess of the gravy, and i think thats the uniqueness of the gravy.

Baingan ka Salaan

Recipe Source: Nita Mehta's Cook in Minutes
Ingredients:

4 Green Chilli's
5 Purple Brinjal's - sliced in round shape's (refer picture)
Tamarind paste - 2 tsp's
Chilli powder  - 1 tsp
5 tbsp Oil
1/4 tsp Mustard
1/2 Onion - finely chopped
Curry Leaves - 1 sprig
Thick Milk - 1/4 cup or Fres Cream - 2 tsp's

To Grind:

2 tbsp sesame seeds
2 tbsp peanuts
1 tsp grated coconut
6 flakes of garlic
1 inch of ginger
1 tsp Cumin
2 tsp's of corriander powder
a pinch of turmeric powder
Juice of half of a Lemon

 Grind the above all together into a smooth and thick paste with 2 tbsp of water.

Brinjal Green chilli Gravy

Method:

Heat Oil in a Thick Bottomed pan, add slitted green chilli's and fry them. after frying remove it from oil.
Then add round sliced Brinjal's to the oil and fry them for 5-7 minutes till they are cooked and turn into golden colour. once the brinjals are cooked remove them from oil.

add mustard, curry leaves to the oil and let the mustard splutter. now add frinely schopped onion and fry them till they turn translucent.

Now add the grounded smooth paste and mix with the onions. add 2 cup's of water and tamarind paste and bring them to boil.

Then add the fried green chilli's and brinjals to the pan and mix well. Let the gravy simmer for another 2-3 minutes. Then remove the gravy from the flame and add 2 tsp of fresh cream or 1/4 cup of thick milk.

Serve with Rice or roti's.

Tuesday, December 7, 2010

Mixed Bean Soup

The Climate in chennai is Chill, with lots of Rain. For this chill climate, nothing other than soup on table makes you comfortable. As me and my son love to have soup, i find different soups from other blogs and create it at home. two days back i soaked lots of beans to prepare these mixed beans soup and then searched at many blogs and found the prepation is more similar to Indian Curry.

Mixed Bean Soup

Most of the recipe called for some broths, you can use vegetable broth or just go with plain water, like what i made. the other ingredients mentioned in the recipe are, Chilli Powder, Corriander powder, cumin powder and little curry masala powder. Now say, does'nt it sound like Indian Curry Ingredients?

Beans to Soak:
soak 1/4 cup of each beans overnight.

Kidney Beans / Rajma
Cowpeas / Kaaramani
Brown Chickepas
Chickpeas
Mochai / Hyacinth

Ingredients:

Onions - 2
Tomatoes - 2
Garlic - 3 cloves
Bay leaf - 1
Cinnamon Stick - 1 inch
Cloves - 2
Olive Oil - 1tbsp
Dried Parsley or Oregano - 1 tbsp
Water or Vegetable  Broth - 3 cup's

Chilli Powder - 1 tsp
Corriander Powder - 2tsp
Cumin Powder - 1/2 tsp
Curry Masala Powder - 1/4 tsp (optional)

Method:

In a Wide Pressure Cooker, heat a tbsp of oil, add cinnamon stck, cloves, bayleaf and saute them. next add finely chopped onions and fry them, on next, add finely chopped tomatoes , crushed garlic pieces and mix along with onions and fry them.

Add chilli powder, salt to taste, corriander powder, cumin powder and curry masala powder and mix well with the onion-tomato mix.

Next add overnight soaked beans to the onion-tomato-masala mix and give a mix. add 3 cups of water and mix well. close the pressure cooker with its lid and put on its whistle and let the cooker be on high flame till it whistles 4-5 times. switch off the flame and let the pressure releases and open the cooker.

Sprinkle some Dried Parsley or oregano and serve hot.

Foccacia with Mixed Bean Soup

I served the Soup with some Wheat Foccacia. It filled our tummy very much. With all the beans you get the necessay protein and energy. wheat gives the needed fibre content. It was a simple and hearty meal together.

Wednesday, December 1, 2010

Dinner Knots

Iam trying to make breads or work with yeast since 2008 december, thats when i bought my Microwave Convection Oven. I was not at all satisfied baking breads in convection mode. then i got my OTG, which did'nt disappoint me. I keep on trying stuffs with yeast, rather than cakes. On one of my try, these dinner knots came out so so so Perfect for me. They turned out so soft and Flaky. Now its here to be presented for you All..

Dinner Knots

Ingredients:

Active Dry Yeast - 1 tbsp
Sugar - 1 tbsp
Warm Water - 1/2 cup
Warm Milk - 1/2 cup
Olive Oil - 1/4 cup
Egg - 1 beaten
Sea Salt - 1/2 tsp
All Purpose Flour / Maida - 3 and 1/4 cup (divided)

Egg Glaze:

1 egg
1 tbsp of water
Sesame seeds for topping

Dinner Knot

Method:

Warm half a cup of milk and dillute half a cup of warm water. Mix Sugar and Yeast with the dilluted milk and mix with a spoon. try to mix as much so that the yeast and sugar gets dissolved. close it and keep aside for 5 - 10 minutes, till frothy layer is developed due the activeness of the yeast.

Now in a wide bowl, add 1/4 cup of Olive Oil, add beaten egg to the oil and keep whisking with a whisk. add sea salt and whisk vigorously. Now add the yeast mix and keep whisking.
Now add 1/2 cup of flour and whisk, keep adding the rest of flour as half cup at a time. when the whisk clogs with the dough, shift to a wooden spoon and mix. then start mixing with hands and knead the doough for atleast 5 minutes. add little olive oil in the end and knead it once.

Take a Bowl, grease it with olive oil and place the kneaded dough and cover it and rest it for 1 and half hours atleast so that the dough gets doubled in size.

Line the baking tray with baking sheets. Pinch a small portion of the raised dough and roll it like a rope about 7 inch long and 1 inch wide.Now Cross one side of the rope over the other to form a Loop. Now take a tip of  the rope that is on top and tuck it under and through the centre hole to tie loosely into a knot. One of the rope should pop up through the loop hole.

Place the knots on the greased tray, each 2 inches apart from each other and cover loosely with a plastic wrap and let it rise for 10 minutes.

Pre-Heat the oven at 190C for 10 minutes and bake the dinner knots for about 18-20 minutes. Beat a Egg with 1 tbsp of water and with the help of a brush, brush it on top of the knots. and sprinkle some sesame seeds over then keep them on oven in broil mode for 3-4 minutes to get the browning effect on top.

Then Remove from the oven and let it cool and Serve.

Hot Bun

I served these Dinner Knots with Jam to my kid and we had it with Soup. It was all together a New Dinner Experience for us on that Day!


Friday, November 26, 2010

Raja Raja Chozhan Dosai

Are you wondering about the name of the post or the dosa name, come on i will tell you all about it in next few lines. Raja Raja Chozhan,  a Tamil King, who had build the famous Tanjore Big Temple. This Year 2010, the Tanjore Big Temple completes 1000 years. In such a Celebration Time, one of Uduppi Restaurant in Chennai, Pondy Bazaar, called Matsya, is celebrating the occassion, by giving the name of the king Raja Raja Chozhan to a Good Dosai. if you have not visited the tanjore Big Temple, Please do visit the temple in evening. with full moon or with moondraam pirai, it will be a pleasure to see the temple. According to me Tanjore is the Best place to taste authentic Tamil Food.

Masala for dosai

Whoever have read Ponniyin Selvan, a novel written by kalki, will sure loved the characters of the novel. My favourite characters in the novel are Raja Raja Chozhan, Poonkuzhali, Vanthiya devan, Kundhavai, Aazhvar kadigan and at last Nandhini.

enough of novel thoughts.

Yesterday, i tasted this dosai at Matsya restaurant, and today i prepared and am blogging it now. Its the casual stuffing other than potato masala. the stuffing has onion, tomatoes and capsicum. it may sound simple, but it has a different taste, that will make you crave for another dosai.

Raja Raja Chozhan Dosai

Ingredients:

Oil - 1 tsp
One Onion
One Green Chilli
Two Tomatoes
1/4 of a Green Capsicum (you can add combination of green and red capsicum)
Curry Leaves - 1 sprig
Chili Powder - 1 tsp
Corriander Powder - 2 tsp
Salt to taste
Finally a tsp of Ghee.

Method:

Heat a Pan, add 1 tsp oil and heat it. add mustard and let it splutter. add finely chopped curry leaves, green chilli and onion and fry them well. Add finely chopped tomatoes and fry it too. add finely chopped capsicum's and mix along with onion-tomatoes. add salt to taste, add chilli powder, corriander powder and mix well. Try to mash the tomatoes and capsicum and mix together. add very little water to get the consistency, as shown in the above pics. finally add a tsp of ghee and remove the stuffing from flame.

Prepare dosai's and spread 2 tsp's of stuffing in the centre of the dosai and fold it to get the traingle shape. serve it hot with coconut chutney..

Stuffing for dosai


We enjoyed this dosai very much. do try this and enjoy it.


Thursday, November 18, 2010

Diwali Sweets and Snacks event Roundup

When i announced Diwali Sweets and Snacks Event, i had a motive of getting many sweets ideas , that i could try to prepare for diwali. Though i could not have prepared for this Diwali, next year, this round up will be very usefull for me. I received quite unique entries, How many varieties of Badam Halwa including Vaishali 's Vegan Badam Halwa, and a rare Aalu Halwa from Sundari. I Very Much enjoyed receiving multiple entries from Priya, Sharmi , Cilantro and Shivani. Though Preparing for the Roundup is time consuming job, i enjoyed every bit of putting together all your Sweet entries into this Post.

Thanks Very Much For Sending in Your Sweets and Snacks to my Diwali Sweets and Snacks Event! I have classified all the entries into Six Categories of Halwa, Milk / Khoa Sweets, Burfi's, Traditional , Laddu's and Palakaaram Snacks. Hope you all enjoy the roundup as i did.

Halwa:

Priya Sreeram's Gajar ka Halwa


From Halwa


Nidhya's Badam Halwa


From Halwa

Sundari's Aalu Halwa


From Halwa

Ingredients:


Potatoes - boiled & mashed without any lumps ( i used 3 large potatoes approx 350 gms)

Sugar - equal to the amount of mashed potatoes

Ghee - 150 to 200 gms.

Food color of ur wish

Method to Prepare:

First take a pan and add sugar, then add water till it gets immersed.. Let it boil till the pisukku patham.

Now add any food color of ur choice at this stage( i dint add any)..

Add the mashed potatoes and keep stirring and avoid lumps...

Once it becomes thick start adding ghee and keep stirring..

Continue the process until the halwa does not stick to the pan (nalla surundu varum). U can also check it this way - wash ur hands and if u touch the halwa it shud not stick to ur hand.. ( Be careful)..

U can also decorate with cashew/badam...

Aalu halwa is ready.. It will dissolve in ur mouth..Slurp!!!

Vaishali's Badam Halwa


From Halwa


Ila's Badam Halwa


From Halwa


Ila's Carrot Halwa


From Halwa


Sharmi's Pumpkin Halwa


From Halwa


Mahimaa's Carrot Halwa


From Halwa


Sowmya's Ashoka Halwa


From Halwa


Shivani's Badam Halwa


From Halwa


===================================

Milk / Khoa Sweets:

Jaleela's Gulab Jamun


From Milk or Khoa Sweets


Akila's Rasgulla


From Milk or Khoa Sweets


Akila's Rasmalai


From Milk or Khoa Sweets

Kurinji's Rasgulla


From Milk or Khoa Sweets


Lavi's Gulab Jamun


From Milk or Khoa Sweets

============================================


Traditional Sweets:

Priya's Chandrakala


From Traditional

Sharmi's Paneer Jilebi


From Traditional

Priya Sreeram's Mysore Pak


From Traditional

Cilantro's Athirasam


From Traditional

Sharmi's Kesari Puran Poli


From Traditional

Anu's Panasa Tonalu


From Traditional


==============================================

Laddu:

Dershana's Coconut Laddu


From Laddu's

Dershana's Paruppu Urundai


From Laddu's

Deepthi's Rava Laddu


From Laddu's

Cilantro's Rava Laddu


From Laddu's

Shivani's Rava Laddu


From Laddu's

Sharmi's Coconut Laddu


From Laddu's

Prema's Nei Urundai


From Laddu's

Lavi's Maaladu


From Laddu's

=====================================================

Burfi's:

Neeraja's Choco Balls


From Burfi's

Kalva's Besan Burfi


From Burfi's

Sharmi's Besan Burfi


From Burfi's

Sharmilee's Kaju Katli


From Burfi's

Priya's Maida Cake


From Burfi's

Priya's Saffron Paneer Burfi


From Burfi's

Priya's Kaju Katli


From Burfi's

Lavi's Kaju Roll


From Burfi's


==============================================

Palakaarams:

Lavi's Murukku


From Palakaaram Snacks

Jaleela's Thattai


From Palakaaram Snacks


Anu's Sanna Kara


From Palakaaram Snacks

Sharmi's Pesara Vadai


From Palakaaram Snacks

Sundari's Thukkada


From Palakaaram Snacks

Ingredients:


Maida - 2 cups

Salt - 1 tbsp

Chilly powder - 1/2 tbsp

Ginger - 1 small pc

Oil - 4 tbsp for the dough & to fry

Method To Prepare:

Take a bowl and put maida, salt, chilly powder... Heat 4 tbsp oil and pour on the flour.. Take ginger and make a paste, extract the juice and add it to the flour.. ( u can also crush it randomly and add it if not for the juice) but the juice is best,otherwise the pcs will come in ur mouth when u eat ( i hate that)..

Now make dough like we make for poori's...

Make normal poori's and cut them in diamond shapes and deep fry.

Simple thukkada is ready..

Store it an air tight container..


Sangeetha's Thattai


From Palakaaram Snacks

Sangeetha's Murukku


From Palakaaram Snacks

Sharmi's Potato Cheese Balls


From Palakaaram Snacks

Sharmi's Chekkalu


From Palakaaram Snacks

Cilantro's Ribbon Pakoda


From Palakaaram Snacks

Priya's Quinoa Thattai


From Palakaaram Snacks

Priya's Oats Coconut Murukku


From Palakaaram Snacks

Priya's Omapodi


From Palakaaram Snacks

Shivani's Kadboli


From Palakaaram Snacks

Shivani's Shankarpalya


From Palakaaram Snacks

Shivani's Jeera Shankar Palya


From Palakaaram Snacks

Akila's Kaara Boondhi


From Palakaaram Snacks


My Heary Thanks to every Participants!!!! If you find any broken links or any error, please let me know by giving a comment below. Thank You All!!
Related Posts Plugin for WordPress, Blogger...