Thursday, December 31, 2009

Kaaraamani Kuzhambu / Lobia Curry

Recipe Marathon - Lap 7 (Final Lap)

It was just 7 days, and it flew away very fast. I enrolled myself for Nupur's Marathon, as i had many post pending on my draft and also hubby had his Project Delivery Time & was working till mid-night, So i needed some blogging time, to keep me occupied. Iam Glad I enrolled, as i got many new friends from the marathon and got to learn how to allocate time for blogging for the day.
Now I wonder, how 7 days flew so fast....

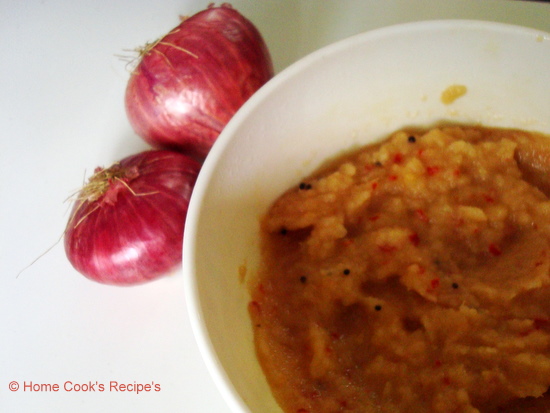
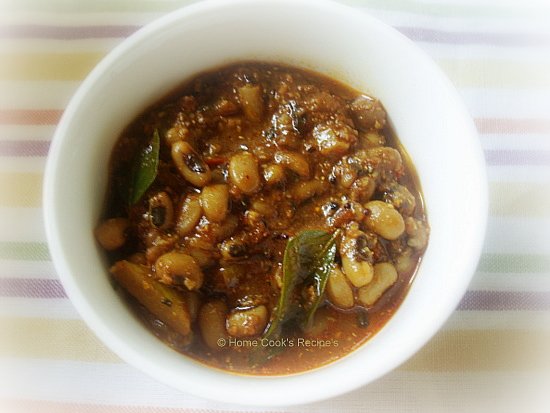
Coming to Today's Recipe Lobia / Cow Gram Curry / Kaaraamani Kuzhambu.

I don't know why, my hubby fasts on the year end. He fasts till evening and for night, he eats just fruits. so i knew, that iam alone going to eat this curry and thought why not experiment with different flavour's. I added what all caught my eye on my pantry.

Lobia / Cow Gram Curry / Kaaraamani Kuzhambu

You Can't guess, what mystery ingredients i added, just from the look or taste. But all togeather gave a nice taste, that you all should try, thats why iam posting it here.


Ingredients:

Cow Gram / Lobia / Kaaraamani - 1 cup (Soaked in water for overnight)
Tomato - 1 (finely chopped)
Garlic - 3 cloves (chopped)

Grated Coconut - 2 tbsp's
Anardana seed's / Dry Pomegranate Seeds - 2tbsp's

Kasuri Methi - 2 tbsp's
Turmeric Powder - a pinch
Kuzhambu milagaai thool / Chilli Powder - 2 tsp

Oil - 2tbsp
Mustard - 1-/4 tsp
Fenugreek - 1/4 tsp
Asafoetida powder - 1/4 tsp
Curry Leaves - 8

Method:

Heat Oil in a Kadaai or Pan. Add mustard and wait till it splutters. add fenugreek seeds, asafoetida powder and curry leaves and saute them.

Pressure Cook the Cow Gram / Kaaraamani / Lobia with 1/4 cup water and little salt upto 4 whistle's.

Grind the Grated Coconut and Anardana seeds into a coarse powder and keep aside.

Now Add the Tomato and Garlic. fry them till the tomatoes get mashed.

Now add turmeric powder, Chilli Powder, salt to taste and mix well.

Add the grounded coconut + anardana seed powder to the pan and mix well with the tomatoes.

Add the cooked lobia / kaaraamani to the pan and mix well.

Add 1/2 cup water and kasuri methi, Curry Leaves and salt to taste to the pan and mix well. let the curry boil for 5 minutes in medium flame.

This Curry tasted so Good, the anardana and kasuri methi gave nice taste to the curry.

It tasted excellent with Hot Idli's.

* You can also add tamarind paste to the curry, if you like the tangyness.

Wish You All and Your Family A Very Happy New Year....

New Year Wishes


Wednesday, December 30, 2009

Power of Onions

Day - 6 Running on Recipe Marathon.

This post was on my draft for an year. Today iam pulling out from draft for you all. This is an Informative post.

First Iam sharing my Quick Onion Chutney...

Onion Chutney served with Hot Steamed idli's, is certainly a divine combi.

Onion Chutney

Ingredients:

Raw Onions - 2

Dry Red Chilli - 3

Oil - 1 tsp

Method:

Saute the chopped onions and red chilli's in a pan with one tsp of oil for half a minute. let it cool and grind it into a paste by adding 3 tbsp's of water and salt to taste.

if you wish you can season it with mustard, split urad dal and curry leaves.


Serve with Idli's and Dosa's.


Power of Onions:

1. Just crush a peeled small piece of onion, and inhale the smell of its juice, to get rid off your headache's.

2. Onion's are Just Packed with anti-biotic properties. it is proven that, it can help in curing cancer and TB.

3. Onion's work good for heart, as it helps in reducing hyper-tension and cholesterol, thus prevents Blood Pressure also Heart-Attack.

4. Onion's are also said to have anti-septic properties.

6. Onion's can help you to get rid off gastric problem's. (vayuthollai in tamil)


I want to share about this miraculous soup. it just helped to clear my nasal congestion, in minutes. Onion's are best to help you out, when you are affected by cold/flu.

This Onion Soup could prove, you can try it out and tell me..

Onion Soup for removal of Nasal Congestion

Onion Soup

Ingredients:

10-12 Small Onions

1-Big Onion

1 Cup- Water

1tsp-corn flour(optional)

Salt(optional)

Method:

Just peel the outer skin of the small onions and big onions. Big One's can be chopped into four quarter's. In a cup of water, boil these onion's for 5-7 minutes. or you can microwave it for 4 minutes. You can have this with onion's if you like or you can filter the water alone into a glass. you can add salt to taste.

If you want this soup to be little thick, have the cornflour with some water and make it into a thick paste. add this paste to the onion water and let it boil for 2 minutes. if you wish, Garnish the soup with spring onion's.

On having this soup, within minutes, you can sense that you nasal congestion is cleared.

*****************************************************************************


Sauteed Onion's and Garlic for Reducing body heat and Gastric Problem's

A Recipe, that can make your body cool or to say in other words, it reduces your body heat.

Ingredients:

8 cloves of Garlic

10 Small Onion's

Method:

Fry the Garlic and Small Onion's in a tsp of ghee.

Add salt and saute them well.

Mix the sauteed one's with hot rice.

This will certainly help you out in reducing your body heat and gastric problems.


Finally let me tell you a Fact.

Small Onion's have more Protein, Mineral's, Carbohydrate's, Energy, Phosphorus and Iron than Big Onion's.

So Eat Onion's, it will Fight for You.


Check the Highlights of Recipe Marathan

Tuesday, December 29, 2009

Szechuan Sauce and Szechuan Chilli Paneer Gravy

Day - 5 on Recipe Marathon..

Soft Paneer on Spicy Sauce. This Szechuan Chilli Paneer Gravy will surely impress Paneer and spice lovers. I prepared this chilli paneer gravy without adding szechuan sauce, but it did'nt taste that good. so this szechuan sauce is a must to prepare this gravy.

I prepared Szechuan Fried Rice, Szechuan Fried Noodles, Szechuan Potatoes and Szechuan Egg Fried Rice with the Szechuan Sauce. I completely enjoyed this sauce's addition in all the dishe's.

Szechuan Sauce

Recipe For Schezwan Sauce:

{You can make 4-5 servings, with the sauce. }

Oil - 5 Tbsp's

Dry Red Chilli's - 20

Garlic - 10 cloves

Scallions / Spring Onions(White Part)  - 5 [or use one Big White Onion]

Corriander Leaves - fistfull (5 tbsp's)

Corriander Stem's - 10

Vinegar - 3tbsp's

Kashmiri Chilli Powder /  Paprika- 4 tbsp's

*You can add more kashmiri powder, if you prefer spicy and colour in your sauce. ( i added more)


Method:

Soak the Red Chilli's in hot water for about 3 hours.
Drain the Chilli's and Grind it along with other Ingredients. Add little water to get a smooth paste.

Heat a Pan. pour 5 tbsp's of oil. heat the oil. add the grinded sauce to the pan and stir well.
Let the pan sit in medium flame for about 5 minutes.
Let the sauce cool and store it in an air tight container.

I was able to cook 5 servings with the above ingredients. and the sauce stayed fresh for about 3 weeks in my fridge.

Szechuan Chilli Paneer Gravy:


Chilli Paneer Gravy


Ingredients:

Paneer - 100 gms
Red Onion - 1
Green Bell Pepper /Capsi - 1/2
Garlic - 5 (finely sliced)
Green Chilli - 2 (Finely sliced)
Corn Flour - 2tsp's
Spring Onion's (Green Part) - 2 (finely chopped)
Olive Oil - 1 tbsp
aji-na-moto - a pinch

Szechuan Chilli Sauce - 2 tbsp's
Soy Sauce - 1/2 tsp
Vinegar - 1/2 tsp
Chilli Sauce - 1/2 tsp

Method:

Cut the Paneer into small cubes. Roast them in a Tava, till both the sides of paneer turns golden colour.
[The actual Recipe is to dip the paneer cubes in cornflour mix and deep fry them.]

Cut the Red Onion and Capscium in cube shape's.

Mix the corn flour in 5 tbsp's of water without any lumps and keep aside.

Heat a pan, add a tbsp of oil. when it gets heated, add finely chopped Garlic and saute them for half a minute.

Now add the Onion, Capsicum and fry them. also add finely chopped green chilli's and fry it along. Add the roasted Paneer cube's and saute it for a min.

Add all the sauces mentioned and salt to taste. mix well with the paneer, capsi and onion mix.

Now add the corn flour mix and stir well. just let it to boil and switch off the flame.

(If you want it to be in gravy form, add more diluted corn flor mix, or if you want dry chilli paneer, add the corn flour mix and keep stirring, till it gets dried.)

Garnish with Spring Onion's.

Szechuan Fried Rice:

Szechuan Fried Rice

Heat 2 tbsp's of Oil in a Pan, add 2 dry red chilli's and 2 tbsp's of Szechaun Sauce and fry it. Add 1/2 tsp Soy Sauce and mix well. Now add a cup of cooked Rice and mix well. add salt to taste.
add ajinamoto if desired. garnish it with spring onions.
Check the Highlights of Recipe Marathan Day 1, Day 2 , Day 3 & Day 4.

My Fellow Runners on Nupur's Recipe Marathan


Monday, December 28, 2009

Paruppu Thuvayal

If i had to cook in less than 30 mins, then this thuvayal and rasam finds its place definitely. This is my hubby's favourite too. I got the recipe from Kribha. I have tried few recipe's from her blog and loved it a lot. Thanks Kribha for sharing the recipe.

Paruppu Thuvayal

This paruppu thuvayal is served for nursing mom's. The garlic and tuvar dal helps in milk secreation.

Ingredients:

Tuvar Dal / Tuvaram Paruppu - 1/2  cup
Milagu / Pepper - 5
Dry Red Chilli - 3 or  4
Garlic - 2
Asafoetida powder - 1/2 tsp
Grated Coconut - 2 tbsp's
Curry Leaf - 5

Method:

In a Pan, dry roast the above ingredients one by one in the above order. once dry roasted, let them cool.

Add 4 tbsp's of water & salt to taste, along with the dry roasted ingredients and Grind them into a coarse paste.

Transfer the grinded thuvayal to the serving bowl.

Mix the thuvayal with hot rice, add 1/4 tsp of ghee and mix. My way is to pour Rasam generously over the thuvayal sadam and eat it with appalam.

Kothamalli Sadham / Corriander Leaves Rice:

I got to share my Kothamalli Rice Recipe with You all. I prepared my Kothamalli Thokku and mixed with Rice. It turned out excellent. Kothamalli Thokku is one, to be eaten with Hot Idli's or Dosa's. It is also eaten with Noi Kanji, when fallen ill. The Kanji with this thokku is a great combination. anyway for packing lunch, you can mix this thokku with Rice, add some roasted peanuts and pack for lunch.

Check My Kothamalli Thokku Recipe here.

Kothamalli Sadham
[Today's Lunch]

Check the Highlights of Recipe Marathan Day 1, Day 2 and Day 3.

My Fellow Runners on Nupur's Recipe Marathan


Sunday, December 27, 2009

Egg Biryani - Dhum Cooked

Cooking Biryani on weekends is a must for me. I just love the cooking flavour of biryani coming out of every house on weekends. So for my part, i try to tempt others.

Egg Biriyani - Dhum cooked

INGREDIENTS:

Rice - 3 small tumblers
Egg's - 4
Red Onions - 3
Tomato - 1
Green Peas - 1/4 cup
Green Chilli - 1

Milagaai thool / Chilli Powder - 1/2 tsp
Garam Masala - 1/4 tsp

For Thalippu / Tadka :

Ghee / Oil - 6 tbsp's
Cashewnuts - 5
Pattai / Cinnamon Stick - 2 small stick's
lavang / cloves - 2
Sombu / saunf - 1/2 tsp
elakkaai / cardamon - 3
Bringe leaf - 1

For Grinding:

1. Kothamalli kaambu / Corriander Stem's - 5
2. Cinnamon stick (pattai) - 2 smal sticks
3. Lavang - 2
4. Ginger - 2' inch
5. Garlic - 7 (big cloves)
6. Green Chilli - 1
7. Tomato - 1/2
8. Yogurt - 3 tsp
9. Sombu - 1/4 tsp

To Garnish:

Mint Leaves / Puthina - 10 leaves
Corriander Leaves - 3 tbsp's (chopped)
Oil - 3 tbsp's
Red Onion - 2 no. (chopped finely)
Potato - 2 no. (chopped in shape of french fries)

Method:

Boil the Egg's with little salt in 2 cup's of water on slow flame for about 10 minutes. remove the oute shell and leave it aside.

Soak the Rice in water for about 30 mins. If you are using Basmati Rice, soak it just for 10 mins.

Chop the Onion's finely and keep aside. get ready with ginger and garlic.

Now we shall Grind the masala's.. Grind the masala, with the ingredients given under Grinding and keep aside.

Heat a Aluminium Vessel(like the one shown in pic. below) add ghee or oil and let it to heat. Now add cinnamon, cloves, cardamon, bringe leaf, cashew nuts and fry them in slow flame. add saunf and fry it.

Now add the finely chopped Red Onion's and saute them, till they turn light brown. or till u feel
the nice smell of onions.

Now add the Peas and mix well with the onions.

Add the Grinded masala's to the vessel and saute them for 2 minutes, till the raw smell of ginger-garlic goes off.

Now add the soaked rice and mix well.

Add Chilli Powder and Garam masala and mix well. also add salt to taste.

Now add exactly 5 cup's of water and stir well. (if using Basmati rice use just 3 cup's of water.)

Add Boiled Egg's, Mint / puthina leaves and corriander leaves and close the vessel with its lid.

Dhum Biryani Cooking Method

Place a Heavy weighing vessel over the Biryani cooking vessel. I kept my Pressure cooker filled with water on top of the vessel.

Let this Biryani get cooked in slow flame for about 30 mins. Basmati rice may get cooked earlier or just take 20 mins more or less.

Heat Oil in a pan, fry the chopped Red Onions in medium flame till they are browned. this may take atleast 5 mins.

also fry the potatoes.

Now serve the Biryani with fried onions and fried potatoes.

Egg Biryani with Fried Onions and Fried Potatoes

Enjoy the Dhum Cooked Egg Biryani!!!

Saturday, December 26, 2009

Vazhathandu Juice and Pavakaai Juice

After Sweet Treat's of Yesterday, iam sharing bitter and tasteless juices with you. These two juices are good to our body.

Vazhathandu / Banana Stem Juice

Vazhathandu / Banana Stem contains lot of water content in it and it helps in washing out stones from our kidney. Its Good to cook this Banana stem once a week, especially if you are living in a hot place, where your body gets dehydrated soon. I usually cook two dishes with Banana stem / Vazhathandu. its Kootu and Sambhar.

How to Prepare Vazhathandu / Banana Stem Juice ?

1. Get a banana stem, as shown in the pic. with a knife, slit the outer skin. remove the outer skin fully, so that your stem looks fresh now.

2. Chop them into slices.

3. Place them in big Jar of your mixie. add 2 cups of water and run the mixie. Blend it well.

4. Now Filter the juice.

Drink the juice fresh. its better to drink the juice in the morning on empty stomach. if a glass of banana stem juice is consumed daily, its believed that kidney stones passes through urine.

How to Prepare Pavakaai / Bitter Gourd Juice?

Pavakaai / Bitter Gourd Juice

Chop 2 Bitter gourd's to round slices.

Boil them in 2 cup's of water for about 10 minute's. (You can also Microwave for 8 minutes).

Filter the water alone and cool it. ( use the bitter gourd to make some curry/ poriyal)

Add little salt to the juice and consume.

Iam a big fan of Bharathy and her Spicy Chilly Blog. I love all her vegetable preparations and love to try them immediately, after seeing on her blog. they usually turn very good. My hubby gives me one star extra, when i cook from her blog..

Here i leave you all with two curry / poriyal's, that i tried from Bharathy's blog.

Baby Potato Curry:

Thank You Bharathy, for sharing and teaching cooking.

Check Who are all running with me for Nupur's Recipe Marathan

Friday, December 25, 2009

Vanilla and Chocolate Muffins

Merry Christmas and Happy Weekend Dear Readers...

It was one of my wish to participate in a Blog Posting Marathon. finally nearing the end of the year, its fulfilling thru Nupur's Recipe Marathon. Here I Run with Muffin's....

I wanted to Bake some Goodies for Christmas, as i was confident on muffins, went ahead with it. i made both classic Vanilla and choco-walnut muffins. both turned out extremely Good. I did the icing with the Pilsbury vanilla and chocolate icing. it gave a nice look and cream to the muffins. I enjoyed the icing decoration part very much. I just got one muffin to taste. 6 went as gifts, the kid had one, hubby had 4. the muffin i tasted was soaked in Capsicum Sambhar by my kid. ( he should have thought it as Vadai i guess:) )

Vanilla cupcakes with vanilla icing

As i did my schooling in Christian institutions, Christmas Celebrations, Crib's, Santa Claus, Prayers, Colourfull Lighted Hanging Star, Christmas Tree were all not missed every year. But after schooling, i never had a chance to enjoy the christmas spirit. Now again Christmas Spirit got me this year, after Christmas Celebration's at my Son studying School.

Now Coming to the Vanilla and Chocolate-walnut muffin story...

Ingredients: ( 12 Big Muffins)

All Purpose Flour / Maida - 275 gms
Butter - 150 gms
Sugar - 1 and half cup
Egg's 4
Vanilla Essence - 2 cap full (2 tsp's)
Baking Powder - 2 tsp
Baking Soda - 2 tsp

Dark Chocolate Bar - 75 gms / Cocoa Powder - 4 tbsp's
Walnut - 7 (chopped into small pieces)

Vanilla and Chocolate cupcakes

Method:

Pre-Heat the oven to 180c for 10 minutes. Grease the Muffin Pan's with some butter and set aside.

Mix the Flour with Baking Powder and Baking Soda. set it aside.

Powder the Sugar and keep aside.

Beat the Egg's and keep aside.

Add the powdered Sugar to the Butter and Cream it well. I use my hand whisk and whisk for atleast 3-4 minutes, till i notice a colour change of the butter from light yellow to white.

Add the flour to the creamed butter- egg mix and slowly mix it up with a wooden spatula or wooden spoon.

Now add the Egg's and mix the flour well with the other ingredients. add vanilla essence and mix well.

If your flour batter is so tight, add few spoons of warm milk and mix well. Pour the batter to the greased muffin pan's and bake them for 25 mins at 180c. check the muffins, whether its cooked, by inserting a toothpick on the muffin comes out clean. Bake it furthur for 5 - 7 mins if not cooked.

With the Remaining Batter, add the melted chocolate and chopped walnuts. mix well and spoon in on the muffin pan's and bake them for 25 mins at 180c. sprinkle some crushed walnuts over the muffin batter before baking.


cupcakes with icing

Let the Muffin's cool down and decorate it with icing. I used Pilsbury Vanilla and Chocolate Icing. had some chocolate vermicelli and decorated the muffins with that too.

Now these muffins are jingling all the way to asankhana's Jingle event.

Merry Christmas...Enjoy the Weekend!!

Check my Fellow Marathon Runners... Best Wishes to U All..


Tuesday, December 22, 2009

Broccoli Soup

I know iam boring you all with soups. The Climate here in chennai is chill and we need soup's to warm us. so bare with me. Whenever i find broccoli in the vegetable shop, i buy it. so far bought it thrice, once i made kootu with it and kuruma the other time, now its soup. its a versatile veggie, an healthy green veggie too. Coming to the soup. its a easy one.

Creamy Broccoli Soup

Ingredients:

Broccoli Florets - 1 cup (handfull of florets + 3)
Red Onion - 1
Garlic Cloves - 3
Oil - 1 tbsp
Milk - 1/4 cup
Pepper Powder - 1 tsp's

Method:

Cut the Broccoli into small florets. wash them thoroughly twice atleast.

Heat a Pan, add oil & heat it. Now add the Garlic and saute it for a min. then add the onion and saute it till it turns translucent. then add the broccoli florets to the pan and saute it for atleast 4 minutes, till the broccoli turn tender. switch off the flame and let the pan contents cool.

Broccoli Soup

After Cooling, blend all the ingredients in the pan with 1/4 cup milk into a smooth puree.

Now Heat the Puree and add little water, to get the desired soup consistency of your choice.

Add salt and pepper powder according to your taste.

Serve warm with Garlic Breads or Bread sticks.

Thursday, December 17, 2009

Sweet Corn Soup

This Soup is our recent favourite. The Margazhi climate is so chill. Soup becomes must for Lunch in this Climate. This is one easiest soup, i prepare and the bread-winner relishes this soup with some breads:)

Sweet Corn Soup

What i do is, put the corn cob in microwave and microwave it on very high for about 5 minutes. I cool the cob, shred the corns - its a tricky job, I slowly slice the corns with knife. the corns beautifully shreds. I put the corns in my mixer, add some water and grind into thick puree. Then i heat a pan, pour the corn puree onto the pan. I add some water, to make it for soup consistency. In a small cup of water, i add a tbsp of corn flour and mix it without any lumps and add it to the pan of corn puree. I then add salt, pepper to taste and some finely chopped Green Spring Onions over the soup. now in recipe format.

Ingredients : ( soup for 2)

 American Sweet Corn Cob - 1
 Water - 2 cups
 Corn Flour - 1 tbsp (mix it with 5 tbsp's of water)
 Pepper - 1 tsp
 Salt - to taste
 Spring Onions (Green Part ) - 2 (finely chopped)

Method:

Microwave the Corn on Very High for about 5-6 mins. or Pressure cook the corn for atleast 5 whistles.
cool the corn and shred the corns from the cob.

Grind the corns with half cup of water into a smooth puree.

Mix the corn flour with 5tbsp's of water without any lumps and keep aside.

Heat a Pan, add the smooth corn Puree and 1 cup of water. Let it come to boil.

Add the corn flour-water mix to the pan and let it boil.

Add Pepper powder and Salt to taste. and add chopped spring onions green part on top of the soup. let it boil for a minute and switch off the flame.

Serve warm with some Bread sticks or Bread.

Sweet Corn Soup with Garlic Bread

oh..Garlic Bread i forgot You. Its easy. Get 2 slices of bread. toast it with some butter. apply some Garlic Cheese on one side of the bread and top it with finely sliced Garlic. sprinkle some oregano on top. If you have Microwave with Grill. Pre-heat the oven for 5 mins. Grill the Bread, with cheese top facing the gril. Gril it for 3 to 4 mins.

If you don't have microwave, then do it on Dosa Tava, just close the tava with lid. slow the flame. its just enough if the bread gets heated and the cheese to raises a bit. Enjoy Garlic Cheese Bread with warm soup.

Saturday, December 12, 2009

2 Years...

Exactly before 2 years, i started this blog. how dare i started a recipe sharing blog, without knowing anything other than chutney, sambhar, curry. i really wonder my courage on starting this blog!! with much interest, then i learned to cook other than chutney, sambhar. this place motivates me to learn more and more. Food photography, Baking, little of Web Designing were all learned bcoz of blogging. I should also tell, Blogging kept my mind busy and thus avoided tons of worries.

Chocolate Muffins
Chocolate Muffins to Celebrate the Moment

When I check the comments of you all in the morning, the enthusiasm you all give thru comments stay with me all thru the day. Every Comment makes me smile and proud. Every E-mail from you make me feel your love. This Blog is a Feel Good Home for me. Thank You Friends for all your comments and emails.

Chocolate Muffins with Chocolate Sauce

I want to continue this blogging passion to enrich me knowledge wise, to gain lots of friends and to record all my recipe's for my daughter-in-law and to my Grand Children's and the Generations to come.

Chocolate Muffin

Now Have a Slice of Chocolate Muffin & Wish me and my blog All the Best!!

Thursday, December 10, 2009

Spicy Tomato Pasta - Indian Version

This Tomato Pasta used to be our Brunch on weekends. It can be done quick and its tastes Great, what more needed for a brunch? This is Indian version, as lots of chilli powder is added. I prefer adding Kashmiri chilli powder, as i love the wonderfull colour of it. While serving, i grate some processed cheese over the pasta, so that it little balances the spice. If you are not willing to serve your paste with cheese, then reduce the chilli powder.

Tomato Pasta Indian Recipe

Ingredients:

1. Pasta - 1 cup ( i used savorit shell shaped pasta)
2. Tomatoes - 6 (finely chopped)
3. Oil - 4 tbsp's
4. Garlic - 3 (finely chopped)
5. Kashmiri Chilli Powder - 2 tbsp's
6. Salt to taste
7. Turmeric powder - a pinch

Method:

In a Wide Bottomed Pressure Cooker, Heat the oil, add the garlic and roast it.

Add the finely chopped Tomatoes and saute them in oil for 1 minute.

Now add Salt, Turmeric Powder a pinch and chilli powder. mix well with the tomatoes.

Lower the flame and let the tomato absorb the spice. when the tomato mix, starts to emit oil, add the pasta and 2 cups of water.

Pressure Cook the pasta upto 4 whistles. Remove the cooker from the stove and let the pressure get released and open the cooker. stir well. If the pasta is still watery, heat it up again and cook untill the water is absorbed.

If less water is added, pasta may not be cooked soft and the pasta at the bottom of the pressure cooker may get burned.

Serve with Grated Processed Cheese on top.

* I also add Peas to the pasta, it also tastes good.

Monday, December 7, 2009

Healthy Savoury Muffins for Breakfast

I Prepared these Savoury Muffins with Carrot, Cabbage, corriander leaves. I used Wheat Flour and Oats Flour, all these put together and baked without oil tasted really good. The Guilt part was the Egg Yolks. Next time i should try substituting Eggs with Flax seeds. I added finely sliced Green Chilli's and Red Chilli Flakes to add up the spice. It really helped the muffins taste better than bland taste. These Muffins just tasted like Whole Wheat Bread, this reminds me that i should start baking Breads...

Whole Wheat Savoury Muffins

Ingredients:

(Yields 8 Large Muffins)

Wheat Flour - 400 gms
Oat Flour - 75 gms
Salt - 1 tbsp
Baking Powder - 1 tsp
Baking Soda - 1 tsp

Grated Carrot - 3 tbsp
Grated Cabbage - 4 tbsp
Green Chilli - 1 (finely sliced)
Red Chilli Flakes - 2 tsp
Corriander Leaves - 2 tbsp's (finely chopped)

Whole Large Egg's - 2
Buttermilk - 1/2 cup

Method:

Pre-Heat the Oven to 220C.

Mix the Wheat Flour with Oats Flour. add salt, baking soda and baking powder. Mix well with your hands.

Remember : Never Sieve/Sift the Wheat Flour. The Nutrients are lost when sieved.

Now add Grated Carrot, Cabbage, Green Chilli, Red Chilli Flakes & Corriander Leaves to the flours and mix well.

Beat the Egg and add it to the flour. mix with a wooden spoon.

Add Buttermilk to the flour and mix well with the spoon. I kept mixing with hands. It should be like our little watery chapathi dough.

Grease the Muffin Pan and spoon in the dough into the moulds.

Bake it for about 20 minutes at 220c. and check whether it has cooked by inserting a toothpick or knife in centre of the muffins and comes out clean. If Not cooked bake them for another 5 minutes.

Enjoy the Muffins Warm!!

Healthy Savoury Muffin

How it Tasted?

Muffins did'nt taste bland, as the red chilli flakes and finely chopped green chilli helped a lot in adding spice. Muffins tasted like a spiced whole wheat bread. i could not even spot the Oat flour.
Cabbage and Carrot gave a different touch to the muffins. for me it tasted like a bonda:)

Finally these No Oil Muffins tasted Good.

Saturday, December 5, 2009

Thakkali Sadham / Tomato Rice

I prepared this Tomato Rice for today's afternoon meal. I recently learned this recipe and i have tried it thrice so far. It turned out Tasty and Perfect every time. This Tomato Rice is cooked in Pressure Cooker with the juice of tomato and spices, as a result every rice grain tastes fabulous.

You can prepare this very fast with less work. it tastes equal to Briyani. If you feel, there is no nutrition in it, try adding Mushroom, while sauting the onions, and let us call it as Mushroom Tomato Briyani.

Tomato Rice

Coming to the Recipe

Ingredients:

Rice - 225 gms (3 small Tumblers) - soaked in water for about 20 minutes.
Tomato - 6
Peas- 1/2 cup
Ginger - 2 inch size
Garlic - 6 (big in size ~ Malai Poondu) / 12 (small garlic)
Red Onion - 2 (Big)
Green Chilli - 3
Turmeric Powder - 1/4 tsp
Chilli Powder - 2 tsp (I use aachi kuzhambu milagaai thool)
Garam Masala - 1/4 tsp

Oil - 6 tbsp's
Cinnamon - 1 inch stick
Saunf / Sombu - 1/2 tsp
Cloves - 4
Bringe Leaf - 1

Method:

1. First Heat the Oil in a Wide Bottomed Pressure Cooker. Add Bringe Leaf, Cinnamon, cloves, saunf and fry them for half a minute.

2. Add the Chopped Red Onion's and Slitted Green chilli to the cooker and fry them, till the Onions turn translucent.

3. Grind the Ginger Garlic with 2 tsp's of water into a fine paste. Add the Ginger Gralic paste to the Cooker and fry them, till the raw smell goes off.

4. Chop all the tomatoes and grind them into puree and set aside.

5. Add Peas to the cooker and saute it.

6. Now add the Tomato Puree to the cooker.

7. Add Turmeric Powder, Chilli Powder, Garama Masala and Salt to Taste to the cooker and mix well.

8. Add the Soaked Rice to the Pressure Cooker and add half cup of water to the cooker.

9. Stir well and close the pressure cooker with its lid and weight on it.

10. Let the flame be high and the whistle count be 2. now reduce the flame to the medium level and let the whistle count for 2 and switch off the flame and remove the pressure cooker from the stove and let it cool.

11. Serve it with Onion Raita or Chips.

Thakkali Sadham

We had sip's of buttermilk in between to cool the spicyness in the Rice. It was so spicy and delicious, we all loved it.

Tuesday, November 24, 2009

Veg Schezwan Noodles with Homemade Schezwan Sauce

I love Chinese Food. The Soy sauce, Vinegar, Spring Onion's and a bit of ajina-motto all do a great magic to the simple noodles or rice. When I craved for some spicy noodles, i decided to make this schezwan noodles. Though I had all other sauces in hand, schezwan sauce was missing. i googled and gathered bits and pieces from various recipe's and prepared the sauce.

Szechuan Sauce

Recipe For Schezwan Sauce

You can make 4-5 servings, with the sauce.


Red Chilli's - 20

Garlic - 10 pieces

Scallions / Spring Onions - White Part - 5

Corriander Leaves - fistfull (5 tbsp's)

Corriander Stem's - 10

Vinegar - 3tbsp's

Kashmiri Chilli Powder - 4 tbsp's

*You can add more kashmiri powder, if you prefer spicy and colour in your sauce. ( i added more)


Method:

Soak the Red Chilli's in hot water for about 3 hours.
Drain the Chilli's and
Grind it along with other Ingredients. Add little water to get a smooth paste.

Heat a Pan. pour 5 tbsp's of oil. heat the oil. add the grinded sauce to the pan and stir well.
Let the pan sit in medium flame for about 5 minutes.
Let the sauce cool and store it in a air tight container.

I was able to cook 5 servings with the above ingredients. and the sauce stayed fresh for about 3 weeks in my fridge.


Veg Schezwan Noodles with Steamed Vegetables.

Szechuan Noodles with Steamed Vegetables

Ingredients:

Hakka Veg Noodles - 1/2 packet

Oil - 2 tbsp's

Schezwan sauce - 2 tbsp's

Soy Sauce - 1 tsp

Aji-na-motto - a pinch

Dry Red Chilli - 2

Spring Onions - 2 tbsp's (finely chopped)

Method:

Cook the Noodles as per the packet instructions. i always wash and drain the cooked noodles.

Heat oil in a pan, add the red chilli's and saute it. Lower the flame.

Add the Schezwan sauce to the oil and saute it. add the soy sauce and mix well.

Add the Cooked Noodles and mix along with the sauce.

Add salt and aji-na-motto and mix well.

Remove from flame and garnish with spring onions.


Steamed Vegetable Basket:


Cabbage - 3 leaves

Carrot - 1

Beans - 5

Cauliflower - 5 florets

Baby Corn - 2

Broccoli - 4 florets

Method:

Steam the above all vegetables with little salt sprinkled over them.
serve them on cabbage leaves.

Serve it along with spicy hot schezwan noodles. the steamed vegetables will compliment well to spicy noodles.

Now Iam Sending these Schezwan Noodles with Vegetables to Vaishali for her Its A Vegan World - Chinese.

Friday, November 20, 2009

Chettinaad Egg Curry

This Chettinaad Egg Curry is full of flavours. The Pepper, curry leaves elevates the taste of the curry. Few points i learned in preparing egg curry are, adding saunf / sombu is a must for tadka / thalippu. adding green chilli, dry red chilli, chilli powder and pepper powder each in small quantity makes the difference in taste. i always love to add curry leaves powder to my curry. it makes the curry thicker also the flavour it gives is amazing.

Spicy Chettinaad Egg Curry

Ingredients:

To Crush:

Shallots / Small Madras Onions / Chinna Vengayam - 6
Garlic / Poondu - 5 pieces
Ginger / Inji - 2' inch long
Green Chilli / Pachai Milagaai - 1 and half

Crush the above in your mixer grinder or with your pestle and mortar. (dont add water to crush)

Red Onion / Periya Vengayam - 1 (finely chopped)
Ripe Tomato / Thakkali - 2 (finely chopped)
Boiled Egg's / Muttai - 4
Butter - 1 tbsp


List of Powder's:

Turmeric Powder - a pinch
Chilli Powder / Milagaai Thool - 1/2 tsp
Corriander Powder / Malli Thool - 2 tsp
Pepper Powder / Milagu Thool - 1/2 tsp
Curry Leaves Powder / karivepillai podi - 1 tsp

For Tadka / Thalippu:

Mustard - 1/4 tsp
Saunf / Sombu - 1 tsp
Dry Red Chilli - 2
Curry Leaves - 10
Oil - 2 tbsp's

Method:

First Heat 2 tbsp of oil in a pan / Iron skillet. add mustard and let it burst. Now add saunf and curry leaves. add dry red chilli, curry leaves and roast it.

Add the Crushed Shallots-Ginger-Garlic-Green Chilli to the pan and fry till the raw smell of the ginger garlic leaves.

Add finely chopped onion's to the pan and saute them till they turn translucent. add the tomato and fry it along with onion.

Add salt, Turmeric Powder a pinch and mix with the onion-tomato. fry them till they mix togeather.

Add Chilli powder, corriander powder, pepper powder & curry leaves powder one by one and mix with the ingredients in the pan. saute them well, till the oil emits on sides of the pan.

Add Half slitted boiled egg's to the pan and mix with the masala.

Add about one and half cup's of water and let the curry boil for two minutes in slow flame.

Add Butter and close the pan with lid. switch off the flame and let the curry rest on stove for 2 more minutes.

Serve hot with Rice or Dosa.

* I added curry leaves powder little extra. thats why the colour of the curry is different.
* The Crushed shallot-ginger-garlic-green chilli added made the curry different.
* If you wish to add more pepper powder, reduce the green chilli and chilli powder a little.
* Adding Butter at the end is optional. it thickens the curry a little and it gives richness to the curry.


Wednesday, November 18, 2009

Easy Paruppu Rasam / Rasam Sadham


dal rasam

When it Rain's, I prefer to have hot rasam with steaming hot rice. It can be prepared fast, and there is no way of getting complaints on it from my hubby when served with appalam. Whenever i had fever, my mom comes with a bowl of this hot rasam sadham and feed's me with her hands. soon after getting 5 mouthfull of mom's rasam rice, i could feel refreshed. whats more you need than your mom's hand fed rasam sadham when you are ill. Yesterday it was my turn, to feed my little son, who got fever. i could see, how he turned active and fresh after having this rasam sadham with ghee. Mom's Rasam Sadham are always special to everyone. Isn't it?

paruppu rasam

Ingredients:

1. Tuvar Dal - 3 tbsp's

2. Tomato - 1

3. Ghee / Clarified Butter - 1 tsp

4. Cumin - 2 tsp's

5. Asafoetida powder - 1/4 tsp

6. Rasam Powder - 2tbsp's

7. Water - 1 and half cup's

8. Chopped Corriander Leaves - 2 tbsp's

9. Turmeric Powder - 1/4 tsp


Method:

1.Pressure Cook the Tuvaram Paruppu / Toor / Tuvar Dal with 1/2 cup of water and a pinch of turmeric powder with a small drop of ghee. for about 4 whistle's or till the dal is cooked well.

2.Heat a pan, add a tsp of ghee, add cumin seeds and asafoetida powder. wait till the cumin seeds are roasted.

3.Now add the chopped tomato and saute them along cumin in ghee.

4.Add the Pressure Cooked Toor Dal and one and half cup's of water and stir well.

5.Add Turmeric Powder, Rasam Powder and salt.

6. Add Chopped Corriander Leaves and Let the rasam get heated. do not let it to boil.

Paruppu Rasam

Serve Paruppu Rasam Hot over Rice with a tsp of ghee. Make Pappad's and serve it along.

Saturday, November 14, 2009

Eggless Pumpkin Chocolate Chip Muffins

After getting my muffin tray's, can anything stop me from trying muffins in the new tray? Iam glad that i tried Pumpkin muffins, as i easily prepared it by combining the wet and dry mix. The end result's were much appreciable. I did not feel, that i missed egg as it was fluffy or i could not spot the Pumpkin flavour in spite of using fresh home-made Pumpkin Puree. The spice i prepared for this was extra-ordinary. it filled my home with flavours of cardamon and Nutmeg.

Eggless Pumpkin Chocolate Chip Muffins

First I Prepared the Pumpkin Puree and left it in fridge overnight. Remove the Puree from fridge, just before 15 minutes for preparing muffin mix.

The Spice Mix I prepared had

1. Dry Ginger - 3'inch size (I know its more, but its good)

2. Black Cardamon - 1

3. Green Cardamon - 2

4. Cinnamon - 2'inch round stick

5. Nutmeg - 1/4 (of small nutmeg)

6. Cloves - 3

Grinded the above into a powder and sieved to separate the Ginger's nerves.

* Do not add more Nutmeg, even while preparing in more quantity.

i decided to bake the muffins without egg and butter. am sure, not due to calorie conscious, bcoz i did not have egg's and i wanted to use olive oil substituting butter, to find what difference it makes in taste. I added 2 tbsp's of yogurt at last to get the pouring consistency.

Wet Ingredients:

Pumpkin Puree - 100ml

Olive Oil - 50 ml

Yogurt - 2tbsp's


Dry Ingredients:

All Purpose Flour / Maida - 175gms

Powdered Sugar - 1/4 cup

Baking Powder - 1/2 tsp

Baking Soda - 1/2 tsp

Salt - a pinch

Spice Mix - 2 tbsp's

Chocolate Chips - 5 tbsp's


Method:


Mix the Pumpkin Puree well with Olive oil. keep aside.

Sift the flour with salt, baking powder and baking soda. sift at least twice.

Mix Powdered sugar and spice mix and chocolate chips with the flour.

Add the Wet Ingredients (Pumpkin Puree + Oil) to the flour and mix it wooden spoon.

Add Yogurt to get the spooning consistency of batter to muffin cup's.

Grease the muffin cup with oil and spoon in the batter.

I topped it with some chocolate chips and nuts and some museli.

Pre-Heat the oven at 180C. for about 10 mins.

Bake at 170C for about 35 mins. check whether muffins are cooked and bake it furthur if not cooked.

Cool them and serve with cream on top.

Pumpkin Chocolate Chip Muffin

People at home enjoyed Pumpkin Muffin's and they liked it more than my Pumpkin Pie.
I tried Banana Muffins the same way, but it did'nt turn out well as it was sticky and not fluffy as Pumpkin Muffins. somehow Pumpkin did a magic to these muffin's.

Monday, November 9, 2009

Pumpkin Pie - My First Pie

You can look forward for few more-first attempt's here in this winter. Iam very much interested in baking, but could'nt spare time in finding exact recipe. I feel this is one sort of research work. so here i am documenting my first attempt's. Give your verdicts, I really appreciate your suggestions to bake better next time.

Pumpkin Pie Slice

You Bloggers across the sea tempt me a lot with your baking ventures. I thought that i could never find baking tray's / tart pan's / muffin tray's all in Chennai. But Arundathi was kind enough to share in her blog about currim bhoys in adyar and Nirmala has asked me to visit amma nana, for all the above mentioned pan's and trays. I visited currim bhoys, the shop is filled with lovely dinner sets and glasses, I picked few pans, i would have picked half of the shop, if something called money was with me. This Poor Girl is planning to visit monthly such shops with her monthly savings. Man Proposes - God Disposes (Dont Forget Lavi!!)

Coming to the Pie, I baked it with less tension. I was almost sure that it will turn up pretty good with some blind confidence, and i should say it got baked perfect and tasted so Great too. I did not have any idea of getting heavy cream for whipping cream to add it for pie filling, so ended up in adding full cream. any chennai bloggers reading this, suggest me where can i get heavy cream or is any way to prepare that at home?

How I Prepared Pumpkin Puree - By Stove Top Method?

I prepared Fresh Pumpkin Puree at Home. it was so easy to make, i just removed the flesh from skin with some effort and sauted in skillet with some oil till they turned tender. it took some 5 minutes to saute the pumpkin to tender. i cooled them and grinded the pumpkin's into fine puree. i did'nt sieve it. it got a smooth texture. (I bought 0.695 Kg of pumpkin and pureed it) but i used just half of the puree for two pie's.

Home Made Pumpkin Puree

Ingredients for Pie Filling:

Pumpkin Puree - 200gms
Full Cream Milk - 5 tbsp's
Egg's - 2
Cloves - 2
Cardamon - 2
Cinnamon - 1' inch stick
Dry Ginger - 1 'inch
Sugar - 1/4 cup

Assembling Pie Filling:

I grinded the Sugar with cloves, cardamon and cinnamon into powder form. I did not grind them finely, you can see black spots in the pie because of that.

Beat the Egg's.

Add the Powdered Sugar to the egg's beated.

Add Dry Ginger powder to the egg's.

add pumpkin Puree to the egg's.

Now add Whipped Cream to the egg's. i added full cream instead.

Pumpkin Pie Making

Ingredients for Pie Crust:

1. All Purpose Flour - 175 gms
2. Butter (in chilled form) - 5 tbsp's
3. salt - a pinch
4. Powdered Sugar - 1/ 4 cup
5. Ice water - few sprinkles (2 tbsp)

Add salt to the flour and add powdered sugar to the flour and mix well.

Now add the Butter and mix well with the flour. Keep adding butter, till the flour becomes like bread crumbs.

Now sprinkle some ice water to the flour and get the flour togeather into a dough. (like our chapathi dough) don't add ice water more than 2 / 3 tbsp's.

Now flatten the dough and cover it with a plastic cover and put the dough in fridge for overnight or 12 hours.

Get ready with your tart pan. Just before 30 mins to bake the pie, remove the dough from the fridge and let it get back to room temperature.

Roll the dough thinly and spread it over the tart pan. trim the exceedings.

after spreading the rolled dough over the tart pan, put the tart pan in the fridge for about 30 minutes.

Bake the Crust in Pre-Heated oven for about 10 minutes at 180C.

Now pour the pie filling into the tart pan.

Bake the Pie for about 45 mins at 160C.

After Baking

Check the pie along the crust, for it got set or not. and bake them furthur. 45 mins will be a correct time.

Cool them for few minutes and serve them warm with cream / Honey.

Pumpkin Pie with Cream


It tasted so Great. we all loved it. I liked it in chilled form with cream. Do try this easy pumpkin Pie for Thanks Giving and Enjoy.

Thursday, November 5, 2009

Carrot Moong Dal Kosambari ~ Carrot Salad

Me and My dad frequently visit MTR at Bangalore. The first dish they serve is grape juice and next is this carrot kosambari. Eating Raw carrot is very hard for me, this carrot salad made it easy. i love the moong dal in it and lime juice sprayed over the salad makes me crave for one more serving. so here is my favourite MTR Carrot Kosambari.

Carrot Salad


Ingredients:

Carrots - 4
Moong Dal - 1/4 cup (5 tbsp's)
Shredded Coconut - 3 tbsp's
Corriander Leaves - 3 tbsp's (finely chopped)
Lime Juice - 1 tbsp

For Tadka/Seasoning:

Oil - 1 tsp
Mustard - 1 tsp
Split Urad Dal - 1 tsp
Green Chilli - 2 (finely chopped)
Curry Leaves - 6

Method:

Soak the 1/4 cup Moong Dal in 1 cup of water for about 1 hour.

Peel off the outer skin of the carrots and Grate the carrots & place them in a bowl.

Mix the shredded coconut with the grated carrot in the bowl.

Add Soaked Moong Dal to the Carrot bowl.

Mix well with a spoon.

Heat a small Tadka Pan for Seasoning,
Heat 1 tsp Oil,
add Mustard and let in jump,
add urad dal and let it get roasted,
add finely chopped green chilli's and
add curry leaves.

Now Transfer the seasoning / Tadka to the carrot bowl.

Mix well the contents in the carrot bowl.

Add Lime Juice to the bowl and mix.

Add required salt and Chopped Corriander Leaves to the bowl and mix well.

Serve it Instantly Fresh..


Raw Carrot Salad

Enjoy & Have a Great Weekend!!

Monday, November 2, 2009

Sambhar Rice ~ Sambhar Sadham

My Favourite Food is always hearty sambhar sadham and cool thayir sadham / curd rice. Sambhar Rice with appalam or with potato curry is a perfect combination. I always prepare this sambhar rice, when i have guests. The secret of tasty sambhar sadham depends on the vegetables we add. Drumstick(murungai kaai), Eggplant(kathrikkaai), Radish(mullangi), knol khol (nookal) and capsicum (kudai milagaai) are must. Adding shallots / pearl onions ( sambhar / chinna vengayam ) is must. the other trick is, boiling these vegetables in tamarind juice. I use Sakthi Masala Sambhar Powder. You can use your own sambhar powder. Try using Ghee / Butter to have a tasty Sambhar Rice.

sambhar sadham on lunch box


Ingredients: (Sambhar Rice for 2 people)

Vegetables:

Drumstick / Murungai - 1
sambhar sadhamEggplant / Kathirkaai - 2
Radish / Mullangi - 1
Knol Khol / Nookal - 1/2
Capsicum / Kudai Milagaai - 1/2
Carrot - 1
Beans - 6
Broad Beans /avarakaai - 6
Double Beans - 10 (optional)
Potato / Urulai - 1

Other Ingredients:

Tomato - 1/2
Shallots - 15

Raw Rice - 150 gms ( 2 small tumblers)
Toovar Dal / Tuvaram Paruppu - 40 gms

Tamarind - a lemon size

Sambhar Powder - 3 tsp
Turmeric Powder - 1 tsp

Ghee / Clarified Butter - 5 tbsp's
Mustard - 2 tsp's
Split Urad Dal - 2 tsp's
Dry Red Chilli - 4
Fenugreek seeds - 1/2 tsp
Asafoetida powder - 1/ 4 tsp
Curry Leaves - 15

Corriander Leaves - 4 tbsp's (chopped)


Method:

First Pressure Cook the Rice and Dal with 4 cups of water. The whistle count is 6.

Wash the vegetables and dice them in cube shapes.

Soak the Tamarind in warm water for about 5 minutes and extract the tamarind juice.

Now Cook the Vegetables in extracted tamarind juice with little salt.
I Microwave them in high for about 8 minutes. ( Don't cook Capsicum, shallots and Tomato)
Cook the double beans in prior and add along with other vegetables.

Heat a Pan / kadaai,
add 2 tbsp's of ghee, let it melt and get heated,
add mustard and let it pop.
add urad dal and fenugreek seeds, fry them till they turn golden colour.
add the dry red chilli.
add the curry leaves
add asafoetida powder / hing.

Now add the shallots / small onions and fry them till they turn translucent.
add Capsicum and tomato and saute them till they have shrinked a bit.

Now add all the cooked vegetables in tamarind water to the kadaai / pan along with the tamarind water.

Add one cup of water, Turmeric powder and sambhar powder. also add salt to taste. remember salt is already added to vegetables.

Mash the cooked Rice and dal and add to the pan. stir well, to avoid lumps. mix the rice evenly with the vegetables in the pan.

Add 3 tbsp's of ghee and corriander leaves and cover the pan with a lid. slow the flame. and let it rest for 3-4 minutes in slow flame. keep checking and stir in between to avoid burning the rice in the bottom of the pan.

Switch off the flame and keep the lid closed till you serve.

kadamba sambhar sadham


Serve with a dollop of ghee and appalam on side.

This is a great food to pack for picnic. curd rice and potato curry will make a hearty meal togeather.

Sending this Yummy Sambhar sadham to Divya for her Show me your Lunchbox event.


Saturday, October 17, 2009

The Right Write Taste

Sharing about food, apart from its recipe's and its image's here is exciting me. Like most girls, i started reading cookbooks right from age 12. I mostly read Mallika Badrinath's Book's. Apart from her book's, my grandmom's and her mom's recipe book was very interesting for me to read. I would really admire their handwriting skills and writing the recipe in a clear cut form with exact measurements.

I can approximately estimate, that my grandmom's mom's recipe collection should have been written in early 1970's. Those days were the days, there were no Televisions and no magazines sharing recipes. But my grandmom's have collected various recipes across the states. Rava Upma, was one such, they managed to get the MTR instant Upma Mix alike recipe.I still wonder how they managed to do that. My Grandmom's were living in villiage and thereby no access to xerox machines nearby. sure they should have spend more time on copying others recipe collection wih just Candle Light. Not even they wrote, they have also tried most recipes from their recipe collection. I remember my Grandmom's mom trying variety of pickles.
If you ask me to write down the recipes from my blog to a Notebook, iam sure i cant.

other than this, i really love to read the restaurant food review and watch shows relating to that.
In Tamil, There is a writer called la.sa.ra. His books normally have food combos, which makes us drool, on just reading his recipe told in a different fashion.

One such food combo that i tried from his book was Vendhiya Kuzhambu, Urulai Kizhangu podimaas. the combo was excellent. pairing such combos is one i should note down and try from now on.

These are all the food writings i enjoyed and read. Now iam sending this to Sra'a The Write Taste. Thank You Sra, Now at the end of this post, iam really happy, that i wrote this post. This is one post, that is going to be close to my heart from this blog.

Thursday, October 15, 2009

Cashew Roll / Kaju Roll - Easy Diwali Sweet

Thank You all for appreciating my Kaju Katli. It is really worth trying it out so do try for this diwali. Kid's liked my Kaju katli's a lot. Now coming to the colourfull cashew roll, i made this on the same day i made kaju katli's. its just the roll shape of kaju katli's. since i didn't want to overpower you all with many variety on the same day, i thought of dividing the post seperately for Kaju Roll.

Kaju Katli and Kaju Roll

Three Different variety of kaju sweets, with the same basic preparation.


check the video i made on makiing cashew roll to help you
How to Preapare Kaju Roll / Cashew Roll

First Prepare Kaju Katli Dough. then you can shape the dough into rolls or any desired shape.

Ingredients:


1. Cashews -  1 cup (8 oz)
2. Sugar - 1/2 cup
3. Water - just to the level of sugar immerses ( 4tbsp)
4. Ghee - to Grease your Palms.

5. Milk - 2 tsp's
My Cashews were Big in size, when i powdered them i got about 1 cup.

- Wash and dry your mixer, without any wet.
- Grind the Cashew to the powder form.
The Ratio between Cashew Powder and Sugar is 2 : 1

How to Make Sugar Syrup for Kaju Katli?

Take half cup sugar(3 oz.) in a thick bottomed pan, and pour water till it get immersed (say 4 tbsp of water).

Keep checking every half minute..

1. Soon after the sugar water starts to boil, have a little in a spoon and touch it with your fingers. it will be very sticky to your fingers.( pisukku patham)

2. Second stage is, just drop a drop of sugar syrup on a plate, and tilt the plate, sugar syrup will start flowing.

3. Third and required stage for Kaju Katli is

Drop a drop of sugar syrup, on a plate, it should get set and not move, when the plate is tilted. 


When the syrup attains the third stage, put the cashew powder to the syrup and keep stirring it to avoid lumps. even break the lumps if any formed.

Keep the flame Low and keep stirring for at least 3-4 minutes.

When you see bubbles coming and blowing off from the cashew burfi and when you take it with a slotted spoon ( Jalli Karandi ), and tilt the spoon, The cashew burfi should start sliding vertically like paper and flat. switch off the flame and remove from the stove. (just takes 3 - 4 minutes in slow flame, dont exceed this time, if you are a beginner)

Let it cool for about 10 to 15 minutes in tha kadaai / Pan itself. Let it Cool till your palms could bear the heat for kneading.


Grease some ghee on your palms and knead the cashew burfi dough for about a minute or 2, till they all come out to a big ball shape. (Kaju Dough is ready). 


Add 1 or 2 tsp's of milk while kneading, so that the kaju dough gets its elasticity, which we need while making rolls.

Grease your palms and fingers with ghee/butter/oil (for vegan's). Divide the Kaju katli dough into two parts.

Add Kesari Colour / apple green colour / Red Colour to one portion of the kaju katli dough.

Knead the dough well, to make sure the colour spreads evenly.

Grease your palms again.

Now take a small ball of the plain dough and roll it with your rolling pin or flat it with your palms.
How to Make Cashew Roll

Take a small ball of the colored ball and roll it with your both palms to get a cylindrical shape.

Place the Cylindrical shaped colour dough onto the start of the rolled plain dough.

Gently fold and cover the coloured dough completely.

Tap the Roll with your finger on either side of the roll, to make the roll into a shape.

Roll it gently to make them into a proper roll shape.

Trim the edges of the roll, so that the stuffed colour dough is visible.

Yummy Colourfull Kaju Roll is Ready.


Cashew Roll

Are you wondering How i got the line of colour on cashew roll, i just didn't fold the roll completely, thereby i got my favourite beautifull orange colour lines on the roll.

Different Ideas to Try:

The dough is so flexible, and we can try many variety in it.

Try 3 layered roll.
Stuff the roll with nuts.
If you know carving, try to make like an apple.
Prepare Kaju Pista Roll in the same way, with kaju dough and pista dough.

If you prepare once, you will get so many ideas.

Double Colour Cashew Roll

It just took me two hours, including running behind my son and feeding him. if you have an helping hand and ideas, you can blast them with all colours.

Have a Colourfull Fun Filled Sweet Filled Diwali!!
Related Posts Plugin for WordPress, Blogger...