Monday, December 12, 2011

4 years of blogging

My blog baby turns 4 today. it all started with searching recipe in google for enna kathrikkai kuzhambu, somehow i landed on mahanandi. i explored the site the same day and read few comments and clicked some commenters names and went over their blogs. that was when i discovered blogging. what attracted me towards food blogging was drool worthy pictures. so when i started the blog, i posted just the pictures and not recipes. i was also lucky to have my college-mate to pinpoint my mistakes. she corrected me a lot in initial days and i still respect her comments and ideas.


Friday, December 9, 2011

Chana Biryani

I love to prepare one pot meal quite often. one thing i love about it is, kitchen turns less messy while i prepare one pot meal, especially this easy chana biryani. though named as biryani, not much effort goes in like in biryani. this protein packed biryani is so easy to make and makes a good choice for lunch box. my kid always love this.


Chana Biryani Recipe

Prep Time10 mins 
Cooking Time: 15 mins  
Serves2
Recipe CuisineIndian
Recipe TypeRice

Ingredients:


Chickpeas / Chana - 150 gms (soaked in water for overnight)
Rice - 250 gms / you can use basmati rice if so add rice and water in 1:1 and 1/2 ratio

Onion - 2
Tomatoes - 2
Ginger garlic paste - 1 tbsp
Green chilli - 2

Turmeric powder - a pinch
Chilli powder - 1/2 tsp
Garam masala - 1/4 tsp

Oil - 3 tbsp
Cinnamon stick - 2 " inch size
Cloves - 2
Saunf - 1 tsp
Bay leaf - 1
Star anise - 1

Lemon juice - 1 tsp
Corriander leaves - 1/4 cup chopped


Method:

Wash and soak the rice in water for about 30 minutes.

Slice the onions and tomatoes into thin slices and slit the green chilli's.

Heat a wide bottomed pressure cooker, add oil, saunf, cinnamon, star anise and bay leaf and cloves. saute them and add onions and green chili's. saute till the onions turns translucent. then add ginger garlic paste and saute it along with onions.

Then add chopped tomatoes to the onions and saute them well till they mix up with onions. add salt to taste, turmeric powder, chilli powder and garam masala and mix it well with the onions and tomatoes mix.

Now add chickpeas and rice. mix well with the onions and masala.

Add water in (rice) 1:2 (water) ratio if you are using par boiled rice. if using basmati rice,
 let the ratio be 1: 1 & 1/2. on adding water give them a good mix.

Add lemon juice and give a stir, check salt here. add chopped corriander leaves on top and close the pressure cooker with its lid.

Pressure cook the chana biryani for 2 whistles on high flame and other 2 whistles in low flame. after the whistles switch off the flame and wait till the steam subside.

Serve warm with onion raita.


Wednesday, November 30, 2011

Cream of tomato soup


Soup song, flop song - why this kolaveri kolaveri di??. first i did not understand the meaning of what is soup song, then wiki helped me as it always do. yes kolaveri viral attacked me too. so from soup song to cream of tomato soup...


Friday, November 4, 2011

Arbi fry | seppankilangu roast |Taro root


I just love this veggie from my childhood. Mostly I prepare sepankilangu sambhar. I recently spotted these arbi fry on a buffet at Green Park. I loved it most and now i re-created the dish, just as it was. That’s why I tell you, only a good eater can be a good cook!


Thursday, November 3, 2011

Paneer Peas Masala ~ Restaurant style Gravy

I made few changes to Paneer butter masala and got this recipe. its so simple recipe and also it tastes so so good. my words and the pictures may not do justice to the dish. You have to try and find how tasty this gravy turns out.


Oh this time i'am trying out with step by step pictures. i am finding very difficult to handle the camera on one hand and ladle on other. sometimes hot smoke hits the camera lens, it was a new experience to me. i salute blogger's who make step wise pictures on every post!! without any more excessive talk, i will take you straight to the recipe.


Monday, October 24, 2011

How to make Laddu

Laddu, iam not a big fan for it. but i tell you, its so fun to make and it will be enjoyed by the kids and family. My kid calls it as chotta bheem laddu. My son, just 4 and half year old, kissed my hands and told,"Thank You Amma, for making these chotta bheem laddu!". i was completely flattered on hearing that. i never thanked my mom, whenever she prepared my favourites, but these kids know very well, how to appreciate. Hubby, whenever picking up these laddus, shouts, "kanna laddu thinna aasaiyya" to my son. Iam glad that i made these laddu's for this diwali.


Laddu is one of easiest traditional sweet to make. The trick is on besan flour mixed with water. it should not be thick or watery. it should be like our dosa batter. if this is kept in mind, every other things make you way for perfect laddu. also keep washing the boondi karandi after every batch and wipe it dry with a clean cloth before starting every batch of boondi's. this will make all boondis look even.


check my video of making Boondhi Laddu.

important tip i learned: Laddu's cannot be shaped, when boondi is so hot. leave it to cool down, when the boondi mixture is just warm, start making laddu's. its so easy to shape laddu's.

i referred cilantro and jeyashri's kitchen for making these laddu.


How to make Laddu

Prep Time10 mins 
Cooking Time: 40 mins  
Serves10
Recipe CuisineIndian
Recipe TypeSweets

Ingredients:

Besan flour /  Kadalai maavu - 1 cup (8 oz)
Cooking soda - a pinch
Water - 1/2 cup (more or less)
Oil - about 2 cup's ( for deep frying boondi's)

For Sugar Syrup

Sugar -  1 cup
Water - 1/2 cup

To fry and add to the boondi mixture:

Ghee - 2 spoons (1 and half Tbs)
Cashews - 2 tsp's (broken)
Raisins - 1 tsp
Sugar Candy / kalkandu - 1 tsp (with 1/2 tsp crushed)
Clove / lavang - 1/2 tsp
Cardamom - 2 (crushed)
Pachai karpooram - a pinch (though i did not add)


Method:

1. Get ready with boondi ladle and other ladle's  as shown in the pic below. also have a strainer, to strain the oil from deep fried boondi. (you can also strain the boondis in a kitchen paper towel).

have a dry clean cloth for wiping the boondi ladle after every batch.


2. Heat Oil for deep frying boondi's in a wide pan, so that the frequency of making boondis will become less and make more boondi's in every single batch.

3. Simultaneously to prepare sugar syrup, in a pan, add 1 cup of sugar and 1/2  cup of water. when the sugar syrup boils, switch the flame to medium. check for single string consistency. you will get it in 5-6 minutes. the sugar syrup will be like honey. you can check single string, by  swiping little syrup on your index finger, rub it on thumb and slowly stretch, when you get single string consistency switch off the flame and close the syrup with a lid.

4. Sieve Besan flour and cooking soda together. add water and mix it thoroughly without any lumps. see to that the besan flour and water mixed to correct consistency. it should be like our dosa batter. you can check by pouring a little batter over the boondi karandi and see the boondi's are easily falling out or not. if its not ease, mix little water.


5. Take a laddle full of besan flour mix and pour over the boondi karandi placed little above the heated oil pan. see the boondi's falliing out. Fry the Boondi's exactly for 1 minute. i left the boondi's in high flame for 1/2 minute and in low flame for another 1/2 minute. remove the boondi's to a strainer.

6. Wash the boondi laddle and wipe it clean and dry and start the next batch. dont fry the boondi till they turn golden colour, we dont want crispy boondi for sweet boondi.


7. On finishing making boondi's, add the strained boondi's to warm sugar syrup and mix well.

8. Heat a small pan, add ghee and fry cashews, raisins, cloves and add to the boondi mixed with sugar syrup.

9. Add crushed cardamom and 1/2 tsp of crushed sweet rock candy(kalkandu) & 1/2 tsp uncrushed. mix all together with the boondi mixture.

10. Heat the whole Boondi mixture in the pan in slow flame, so that if  sugar crystalised melts down. just half a minute on slow flame will do. add ghee(1/2 tsp) to the mixture and close the pan with a lid.

11. Let the boondi mixture sit in the pan for 10 minutes. the whole mixture should be warm, when you are starting to shape laddu's. (just shape it, its so easy)


12. Give the laddu's a standing time of about 1 hour, so that it binds up well. store the laddu's in an air-tight container. it keeps well for about a week and more.


Notes:

Few laddu recipes ask to powder little amount of boondi and mix with boondi mixture before shaping laddu's. my boondi's were not crushable, as they were semi-cooked(thats how it should be).

Don't increase the sugar, just follow 1:1 ratio for sugar and besan flour. this yields perfect laddu's and the sugar level is very much enough.

Adding Ghee, helps the laddu to bind, so its must to add the right amount of ghee.

Using a good quality of Gram flour(besan flour) is also important. when i tried two batches, i used two different besan flours which showed difference in boondi's.

Sweet Boondi

I have never imagined that i will be making laddu at home. Iam flying high that i have learned a traditional sweet with ease. For the past week, i was trying few traditional sweets, so laddu also became a part of my experiment. i kept asking my friends for boondhi karandi(perforated laddle) & one of our friend Anitha got her MIL's boondi karandi for me. that was a sweet gesture from her. Thanks Dear! 


Thursday, October 20, 2011

Kaju Pista Roll Recipe with Video | Diwali Recipes

Kaju Pista Roll, I should have made this as soon as i made my kaju katli. I dragged for two years and yesterday i finally made it. If you are going to try kaju katli, reserve some and try these rolls and other designed sweets, which i will be posting next. I referred Sanjeev Kapoor to get idea over pista filling.


Monday, October 17, 2011

Badam Halwa | Diwali Sweets

Badam Halwa brings more and more beautiful memories from past. My ammumma is an expert in making these delicious badam halwa. She always prepares for my birthdays. whenever she prepares, i used to be on her side observing what she does without talking. Both my ammumma and my avva(great grand mom) wont allow me to talk while they make sweets. that way they put all their attention into it. Yes now i also expect the same and its very important to be so cautious every minute while making this halwa.


Monday, October 10, 2011

Sri Lankan Eggplant Curry ~ Brinjal Moju

As I mentioned about Sri Lankan cuisine and my latest obsession with it, here iam sharing a very popular eggplant curry from sri lanka. This is also known as Brinjal Moju. Moju means Pickle.  As the name implies, It  has to be eaten along with rice, some dal, some stir fried greens and a little eggplant moju( just like we have pickle). I also served this pickle with dosa and it was also a winnig combination.


Friday, October 7, 2011

Sri Lankan Roasted Curry Powder


If you have read Ponniyin Selvan by Kalki or Ramayanam, you will be taken a virtual tour to Sri Lanka. I always have a sense of nativity to the country and Tamil people out there.

I love exploring cuisines, my latest attraction is on Sri Lankan Cuisine. So on looking over Sri Lankan Recipes, I realized I should make the Sri Lankan curry powder to get the color and taste of the dish to be perfect.


Monday, September 26, 2011

Dal Tadka


We at home love Dal very much, and I prepare it for chapathis quite often. Two weeks back I watched this Dal Tadka recipe in a cookery show. I tried and had Dal Tadka with Missi roti, it was such an excellent combination and from then the dal taste is still lingering. You can see the cookery shows in you tube.  i am linking one of her show.


Friday, September 16, 2011

Pacha Manga Curry


Drumstick and Mango combination is the best for sambhar. The combination proved again in this coconut based simple curry. This is Muringakka Pacha Manga Curry from God’s own country Kerala. A finger licking curry, with simple recipe is so rare, this curry is one among. you can make this curry in minutes if you have small onions and grated coconut ready in hand.


Monday, September 12, 2011

Bhindi Fry


Me and my son love Bhindi very much. Usually it used to be Vendakkai poriyal at home. After learning to make bhindi in microwave, I make these Masala stuffed bhindi quite often.  After getting request for Bhindi Fry recipe, I googled and found sanjeev kapoor’s besanwali bhindi fry.  It tasted good as it’s cooked with shallots and besan flour. This Bhindi fry can be had with sambhar rice or Roti.


Saturday, September 10, 2011

Ceylon Egg Curry ~ Steamed Egg Cake Curry

I like to try Egg curry in different ways. once i watched this ceylon egg curry on a television cookery show and loved the idea of steaming the eggs and using in curry. i have tried it twice and we liked this ceylon egg curry very much. though i did'nt get perfect steamed egg cakes, the taste was no compromise. If i have used some 5 or 6 egg's i could have got perfect egg cakes. since i used 3, it was not enough for the egg cake to raise. On googling i found a similar type of dish called egg dhoka is prepared in Bengal. You can also refer here for a Dry Egg curry from here.

Wednesday, August 17, 2011

Small Onion Chutney ~ Chinna Vengaya Thokku

This is one of our favourite chutney's. I learned the recipe from aval vikatan. I also clubbed Bharathy's recipe with aval vikatan and got the recipe of this yummy Onion Thokku.

Monday, August 8, 2011

Vegetable Biryani

Biryani's are for Weekends at our home. I delayed posting biryani recipe, as i wanted to find out fool-proof recipe. After getting live demo from one of our friend Anitha on how to prepare this biryani, i could'nt wait long and tried it instantly. It came out so Perfect! Thanks Anitha!

Thursday, July 28, 2011

Veg Cutlet

My Cutlet experiments finally ends here. I have tried to make cutlet before, but ended up in mess. cutlets will break on oil while deep frying or the cutlet drinks more oil. after all such failed attempts, here is my Just Pass Venture for you all. All Thanks to Divya's recipe and Namratha's recipe.

Veg Cutlet

Wednesday, July 20, 2011

Pindi Chana

Chana is favourite at home. I have tried this Pindi Chana twice before, its easy to prepare and comes out Tasty. No wonder TH likes this very much. I was wondering why Pindi is first name for this dish. on googling, i found, This Dish is also called as Rawalpindi Chana or Pindi Chole.

Addition of Anardana seeds and Tea makes this dish quite unique. Anardana seeds is nothing but dried pomegranate seeds. it adds up taste in dishes like this.

Pindi Chana

Monday, July 11, 2011

Malai Kofta

Malai Kofta is such a Rich Dish with Lots of Cream. Ofcourse Deep Fried Kofta's makes it Rich. As i mentioned in my earlier post, We made this Malai Kofta at Our Cooking Session. It turned out Yummy and very Tasty. Recipe may look Lengthy, but once you start making, you can finish off soon.

Malai Kofta

Monday, July 4, 2011

Sponge Cake without Butter

I tried this easy cake from joy of baking. Its such a easy breezy cake. This Cake dont call for Butter, yet it turns out moist and tastes great.


Friday, July 1, 2011

Aloo Paneer Kofta

Iam happy, that we friends started our Interactive Cooking Session. We have decided to try few recipes on every friday. I play the Instructor Role and we are really having fun and food at every session. Today is the second friday we met and so far 4 recipes have been tried. We all put our ideas, while cooking and that makes the session quite usefull to everyone. So our Interactive Cooking Session sounds great isnt it.

We choosed to prepare this kofta, unfortunately we could'nt find bread crumbs.  so we toasted 2 slices of wheat bread and trimmed its edges. cut the bread into small pieces and we powdered in mixie and got bread crumbs. it just worked perfect!!

Aloo Paneer Kofta

Wednesday, June 29, 2011

Mango Phirni ~ Aam Phirni

Mango Season is almost getting over. Along with Mangoes, memories related to mango also makes the season special to me.  Eating Mangoes along with my Grandparents and going back to school after lunch with mango juice strains on uniform. I will be guarding the mango tree at my grandparents house during season. as childrens passing by will throw stones to get mangoes. also we save mangoes from monkeys with a big stick. iam very much missing my childhood days rather than mangoes..

Mango Phirni

Monday, June 27, 2011

Palak Paneer

Palak Paneer is one of my favourite. Its so simple to make and it makes a great pair with chapathi's or even plain rice.

Palak Paneer

Tuesday, June 21, 2011

Lemon Syrup and Lemonade

Lemon always refreshes with its Yellow Colour. I love to have lemon syrup bottle refrigerated for summer season. This season was also no exceptional. What special is, this time i prepared my own lemon syrup and stored it up. I also love lemon Soda. Its the best for Pitham(pitta dosha). I will sure make a post on how i make lemon soda soon.

Lemon

Monday, June 13, 2011

Molten Chocolate Cake

Molten Chocolate Lava Cake, sure you should love this, if you are Chocolate lover. I first had this sort of cake at dominos pizza. once even i tried by making nutella indentations inside chocolate cup cakes. which was good, but i did'nt see chocolate lava from it!! On Googling, i landed on my favourite Joy of Baking, referred to me by Nirmala. I just followed  the recipe and the outcome was Just Perfect to produce Lava..

Chocolate Lava Cake

Friday, June 10, 2011

Barley Khichdi

I rarely try out new recipes for breakfast. When i saw barley khichdi in a magazine, i found its so easy to make. the best time to try is this summer, isn't it? so went ahead and tried this great healthy breakfast. it came out Good, and what a nice way to have barley in khichdi form..i have tried it twice and loved it so much.

Breakfast with Barley


Veg Clear Soup Recipe

Prep Time05 mins 
Cooking Time: 15 mins  
Serves2
Recipe CuisineIndian
Recipe TypeBreakfast

Ingredients:


Barley - 100gms
Moong Dal / Pasi Paruppu - 2 tbsp
Turmeric powder a pinch
Water - 2 cup's (220 ml)
Onion - 1
Green Chilli - 2
Carrot - 1/2
Tomato - 1
Capsicum - 1/2
Corriander leaves to garnish
Oil - 1 tsp
Jeeragam - 1/2 tsp


Method:

I didn't soak barley, but you can also soak the barley overnight, drain it and try, just like sabudana(sago).

Heat Oil in a Pressure Cooker, add cumin, green chilly and saute them. Now add Sliced Onion and saute it along.

Add chopped Tomato to the onions and mix. also add finely chopped capsicum and carrot and saute well.

Now add Moong Dal, a pinch of turmeric powder, and the Barley to the Pressure cooker and mix well.
Add 2 cups of water and stir.  Add Salt to taste. Then Pressure Cook up to 4 or 5 whistles and remove from fire.

Serve warm, garnish with Coriander leaves.

Barley Khichdi


I liked the capsicum, it added a good taste to the khichdi.

Notes:

* Just 100 gms of Barley is enough, if you are cooking for two.
* You can add your choice of vegetables.
* Barley wont be so soft on cooking, it will be like cooked brown rice, semi-hard in texture.
* Barley is best for pregnant ladies.


Friday, May 27, 2011

Nannari Syrup and Sarbath

Nannari is a Summer Special herb from Nature. It Cools down the body heat. There are Plenty of Good things about this herb. It Reduces Pitta dosha from Your body. To Sum up, its best to have during Summer, as it avoids de-hydration. Nannari Syrup is available at all stores, i remember seeing it on Nilgris dept.store. I could have bought one bottle, but the challenge for the food blogger is to try it out, isnt it. Hubby got some Nannari root from Naatu Marunthu Kadai. Googling helped me to land on Jayasree's Recipe. i also referred few other recipe and tried it out.

Nannari

Recipe for Nannari Syrup:

Ingredients:

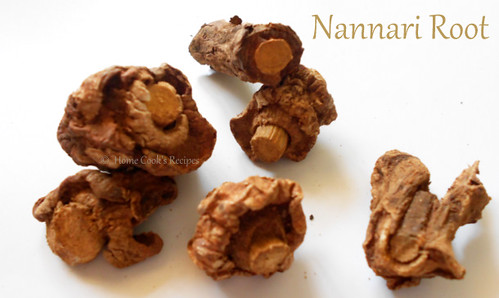
Nannari Root - 50 gms
Water - 2 cups + 1 cup
Jaggery / Vellam - 150 gms

Method:

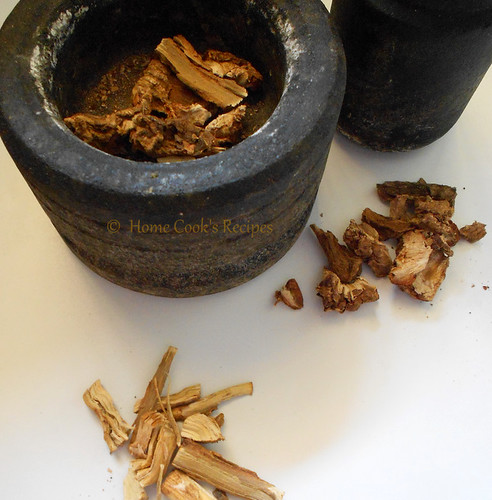
Take a Stone Mortar and Pestle. Crush the roots with Pestle twice or thrice, the root will loosen up and you have to remove the inner part (white part) of the root.

Nannari Root

After Removing, Take the roots in your mixie jar and grind them just for a second. its just to break the roots into small pieces.

Boil 2 cups of Water in a vessel, remove from flame and instantly add the grinded roots and close the vessel with its lid. Leave the Vessel un disturbed for 5 - 6 hours. dont open in between, as you may release the steam. Let the Roots infuse Water

After 6 hours, Strain the roots away. strain with a muslin cloth. Keep the water aside.

Add 1 cup of water to a Pan, Add Jaggery and melt the jaggery and filter it. now heat the filtered jaggery water. slowly add the root infused water to the jagger water and let it boil.

Boil for about 10 minutes in slow flame till they reach single string consistency. remove from flame and let the Nannari Syrup Cool Down.

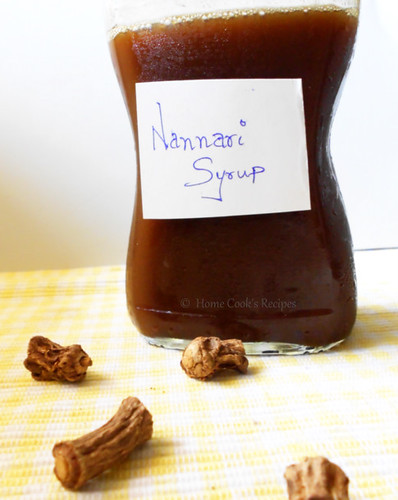
Store the Nannari Syrup in a Sterlised Bottle and you can keep it in fridge and use it.

Nannari Syrup

How to Use Nannari Syrup:

* You can make Nannari Sarbath
* You can mix the Syrup with Tender Coconut Water
* You can mix with Milk
* You can prepare Jigarthanda

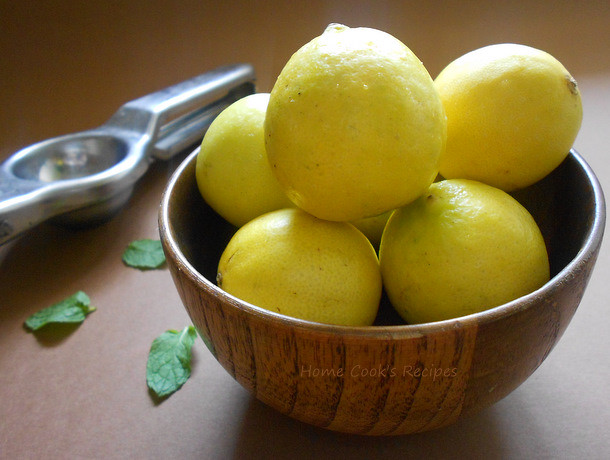
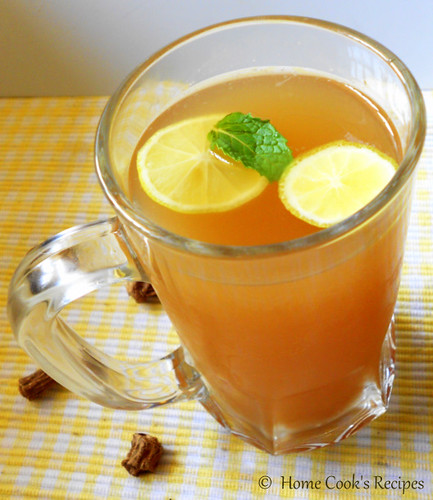
Recipe for Nannari Sarbath

Nannari Sarbath

Ingredients:

Lemon - 1
Nannari Syrup - 3 tbsp's
Chilled Water - 1 Cup

Method:

Extract Juice from the Lemon and mix with Water and add Nannari Syrup to and Mix well. Serve chilled. its better to take this sarbath in empty stomach.

Notes:

* The Roots can be put in Clay Pot of Drinking Water.
* With this Root, kuzhambu can also be prepared.
* Nannari leaves can be used for making thuvaiyal.

Soure about Nannari - My Domestic Helper. I Tell you what, She is  Wikipedia for me and also the best Naturopathy doctor. to be noted, she never stepped school.

Monday, May 2, 2011

Cranberry Scones

I find Scones are very easier ones to try. Scones are always loved at Home. Last Saturday i decided to make these Cranberry scones for break-fast. A typical English Break-Fast after watching the Royal Wedding! It was easy to make and it tasted Great!! I referred Soma's Cranberry and Almond Scones and Joy of Baking to prepare these Delicious Scones.

Cranberry Scones

Ingredients:

All Purpose Flour - 1 and half cup
Dried Cranberry - 1/4 cup
Chilled Butter - 6 tbsp's
Sugar - 1/2 cup
Baking Powder - 1 tsp
Milk - 1/4 cup
Egg - 1

Dried Cranberry

Method:

Pre-Heat the oven to 200C.

Chop the dried Cranberries and set aside. Beat the Egg with 1/4 tsp of water and keep aside.

In a Big Bowl, add the Flour,Sugar, Baking Powder and mix well. To this add Chilled Butter and mix with your hands, the final mix should be like Bread Crumbs.

Now add Dried Cranberries and mix. Add Milk little by little, to gather the dough together. slowly knead the dough and roll the dough for 1/2 inch thickness, with rolling pin.

With the help of Cookie cutter, shape them. place them on greased baking tray with gap inbetween to let the scones expand while baking.

Give an Egg Wash over the scones just before baking.

Bake the Scones at 200c for about 15 minutes till the bottom of the scones gets golden colour.

Once Baked, let the Scones Cool down in wire wrack for about 10 minutes and Serve.

Cranberry Scones


Notes:

You can avoid egg wash and brush just with Milk.

I made the scones thinner, you can make them thick and serve with Jam.

I Grilled the scones for about 2 minutes, to make the scones crisper outside.

Thursday, April 28, 2011

Thakkali Kulambu

We went to Pollachi last week. We Choosed to stay at Maitreyi Vedic Villiage and had a Nice Time with the Nature. The Food over there was so hygienic and it was just like our home made food. The Food Prepared are without Onion and Garlic. We had Thakkali Kuzhambu there and we liked it very much. Today when i was raving about the kuzhambu to my Freind Anu, she said me her MOM's recipe for Thakkali Kuzhambu. I just followed the recipe and got this Lip-Smacking Curry. This is best eaten with Hot Idli's or Rice.

Tomato Curry

How to Prepare?

To Dry Roast:

Dhaniya / Corriander Seeds - 1 tbsp
Jeeragam / Cumin - 1 tbsp
Milagu / Pepper - 1 tsp
Dry Red Chilli's - 3
Grated Coconut - 1 tbsp

Dry Roast the above ingredients one by one.

Thakkali Kuzhambu

Other Ingredients to Grind:

Oil - 1/2 tsp
Tomatoes - 3

Pottu Kadalai / Roasted Gram - 1 tbsp
Turmeric Powder - a pinch

Heat a Pan, add 1/2 tsp of Oil, and add chopped tomatoes and fry them till the tomatoes turn soft and their skin peels off.

Add the fried tomatoes to the dry roasted ingredients. Add Pottu Kadalai and turmeric powder along with the tomatoes, add 1/4 cup of water and Grind them all together into a smooth paste.

For Seasoning:

Sesame Oil - 2 tbsp
Mustard - 1 tsp
Dry Red Chilli - 2
Curry Leaves - 1 sprig

Heat Oil in a Pan, add Mustard seeds and let it splutter, add dry red chilli and curry leaves and roast them. add the grounded smooth paste to the pan. add 1/2 cup of water to the pan and make the kuzhambu thinner.
let the kuzhambu boil for 5 mins atleast and remove it from flame.

Serve Hot with Hot Rice or Hot Idli's or Dosa's.

Thakkali Kuzhambu

Notes:

I avoided Onion and Garlic, you may use it while grinding the masala's.

Roasted Gram / Pottukadalai adds good taste.

You can also add Chana Dal(Kadala Paruppu) if not using Roasted Gram. But Chana Dal should be Dry Roasted.

Adding Coconut is also Optional.

Thursday, April 14, 2011

Elaneer Payasam

It took me 2 years-9 months, to try this Delicious Payasam. I instantly fell in love with Laavanya's Elaneer Payasam, the recipe is so simple. last week i tried and served for my friends(can also be called as food critics). They all Loved it very Much! Thanks Laavanya! The Recipe is so easy and simple, but it Tastes Heavenly. It just takes 5 minutes to prepare. but you got to chill the payasam for atleast 30 minutes. Ideal Dessert to try for this Summer Season!

Ilaneer Payasam

Ingredients:

Tender Coconut Water and Pulp of 1 Tender Coconut / 1 elaneer vazhukkai yudan.
Sweetened Condensed Milk - 150 ml 
Milk(Boiled and cooled) - 1 cup / 200ml
Elachi - 1
Saffron strands - 3
Ghee - 1/4 tsp
Cashews - 3
Raisins - 3

Elaneer Payasam

Method:

Grind the Tender Coconut Water along with Pulp. Need not grind smoothly, as bits of coconut pulp tastes better in payasam.

Mix the Condensed milk with the Chilled Milk.

Now Mix the Grinded Pulp with Tender coconut water  to the Chilled Milk + Condensed Milk. Mix well.

Heat a small pan, add 1/4 tsp ghee, roast the cashews and raisins and add to the Payasam.

Add Crushed cardamom pods and Saffron strands to Payasam.

Chill them in fridge for about 30 minutes and serve.

Chilled Tender Coconut Sweet

Serve with small bits of Tender Coconut Pulp upon the Payasam.

Notes:

* Payasam should be Watery. so adjust the milk and condensed milk ratio.
* You can reduce milk and add more tender coconut water.
* If you dont have Sweetened Condensed Milk, You can Sugar instead to the above recipe.
* Try to serve this payasam little chilled with less sugar, to enjoy the Nature's Best!

Tuesday, April 5, 2011

Low Fat Brownies

I love Brownies but folks at home dont, so baking brownies becomes rare. I baked these low fat brownies for Divya's Brownie Event. Iam making into the event at last minute desperately, as i very badly missed not being part of her Very Famous Best Chocolate Cake Event.

Fudge Brownies

I just want to share 2 Brownie tricks. one is Brownie takes less flour compared to Cakes. second is cooling the baked brownie for atleast 40 minutes is a must. These Low Fat Brownies dont ask for Butter, but still you will never miss butter in brownie. The Guilt part is the Egg's.

Recipe from GoodHouseKeeping's Cakes and Bakes.

Ingredients:

Makes about 12-16 brownies

Olive Oil / Sunflower Oil - 50 ml / 2oz.
Dark Chocolate - 250 gms
Egg's - 3
Demerara Sugar - 150 gms / 5 oz
Vanilla extract - 1 tsp
All Purpose Flour - 75 gms / 3oz
Baking Powder - 1/4 tsp
Cocoa Powder - 1 tbsp
Butter - 1 tsp for Greasing the Cake Tin.

Method:

Pre- Heat the oven at 180C. and Grease the Cake Tin with Butter and set aside.

Melt the Dark Chocolate by placing in Microwave for 30 seconds at 900W. or melt the chocolate by double boiler method and let the chocolate cool after melting.

Break the Eggs into a large bowl, add Oil, Sugar, vanilla extract and whisk well.

Sift the Flour with Baking powder and cocoa powder and mix the flour to the large bowl which had egg-oil whisked. Mix them all together.

Mix Melted Chocolate to the bowl. mix with a wooden spoon. mix very lightly, as the chocolate thickens up the mix so quick. Transfer the mix to the Greased pan.

Place the Pan on Oven and Bake it for 20 minutes.
Once baked, check the brownie by inserting a toothpick close to the centre of the brownie , it comes out clean.

Cut the Bownies, while its still on the pan. and let them cool for about 40 - 60 minutes in the pan.

Remove the Bownies from the Pan and Serve with Ice-Cream.

Low Fat Brownies

To Store, wrap the brownies with cling film and store it in air-tight container.


Thursday, March 31, 2011

Thenga Aracha Kuzhambu ~ South Indian Curry with Coconut

When i get bored with usual curry, i prepare this. This is one of my hubby's favourite. This Curry goes well with Idli, Dosa's and Rice. You can add variety of vegetables, my choice is drumstick, potato and brinjal.

Thenga Aracha Curry

Ingredients:

Drumstick - 1
Potato - 1
Small Onions - 10 (chopped finely)
Garlic - 5 cloves
Tomato - 1 (chopped finely)
Turmeric Powder - a pinch
Tamarind - a small lemon size

For Seasoning:

2 Tbsp of Oil
1 tsp Mustard seeds
1/4 tsp Methi seeds
1 sprig Curry Leaves

To Dry Roast and Ground:

1 tbsp Corriander seeds
1/2 tbsp Urad dal
1/2 tbsp Cumin Seeds
1/4 tsp Methi seeds
3 Dry Red Chilli's
3 tbsp of grated coconut

Dry Roast the above and grind along with 2 tbsp's of Sambhar Powder and 1/4 cup water. Grind it all together into smooth paste.

Thenga Aracha Kuzhambu

Method:

Cook the Drumstick and Peeled Potato in 1 cup of water for about 10 mins.

Soak Tamarind in hot water for about 10 minutes, then squeeze the tamarind and get tamarind pulp.

In a Pan, Heat Oil, add mustard seeds and let it splutter, add methi seeds and curry leaves and roast them.
add garlic, shallots and roast them till they are almost cooked. add chopped tomato and mix well.

Add Turmeric Powder, Salt to taste to the pan and mix well. add the cooked vegetables to the pan and the tamarind pulp. mix all together and let it boil for 2 minutes.

Add the Ground paste to the pan and mix well. add little water, if you want loose curry. let the curry boil for 2 minutes and garnish with corroiander leaves and curry leaves.

Serve Hot with Idli's or Rice.

* Use Coconut Oil, it gives nice flavour.
Related Posts Plugin for WordPress, Blogger...