Showing posts with label Sweets. Show all posts

Thursday, October 20, 2016

moong dal halwa ~ பாசி பருப்பு அல்வா


I completely lost track of blogging. Since i felt i was so obsessed with blogging and checking comments, likes, etc. I thought of staying away for a while. also i had to tutor my son. which left me no time to to revive blogging. but i always  think of what to cook , what props to buy, i even have a lot of drafts pending :) also blame my laziness! Now after a while, when i want to resume, blogging, as gone way ahead, i cant even figure out how much i missed and and how much i am lagging.

Diwali is just a week away and this Diwali 2016 is very special for us because its our Anniversary too. Our son is very much expecting 29th October:) Since its Double Dhamakha, I wanted to make the blog buzzing with sweets:-)

Sunday, October 19, 2014

Tirunelveli Halwa ~ Halwa with Cracked Wheat


Thirunelveli Halwa

Making our traditional sweets brings more happiness. Tirunelveli halwa is my hubby's favorite. He always buys a pack of halwa whenever he visits tirunelveli. I wanted to try this halwa for this diwali, first i was little hesitant to try as it takes lots of ghee to make. Watching masterchef and all the cookery shows, i gathered my confidence and tried it.

Tuesday, October 14, 2014

Jangri Recipe ~ How to make Jhangri


jangri5

Yes! I made it! I jumped out of joy when i saw my jangri holding its shape, i was very thrilled when i tasted crispy and hot jangris. Jangri is my favorite sweet. I like to eat it warm. My Grand father would buy me warm jangri from sweet stalls, and i would devour it! Bliss!! Every diwali i used to experiment making jangri. after failing for 4 years, this time i cracked the jangri code. everyone appreciated it. My son is my best critic. he said its Nice, but it should be more sweet like the ones in sweet shops. Yes he was right. Sweet shops jangri are more sweeter than mine.

Thursday, October 24, 2013

Motichoor ladoo recipe

Motichoor laddu

This is one of my favorite sweets these days. My favorite orange color attracts me to these ladoo i guess. i was quite determined to make this motichoor ladoo for this diwali. it was decided last diwali itself. i was searching for boondhi laddle with small holes for the past one year. i could not find it. compromising it, i made these motichoor ladoo with my normal boondhi laddle. check my boondhi laddu recipe, to know about the boondhi laddle and the other laddle's needed to make these motichoor ladoo.

Monday, October 21, 2013

Dry Fruits Laddu

Dry fruits laddu is also known as Antina unde in karnataka. It is also prepared in maharashtra for krishna jayanthi. When we were in bangalore, we used to buy these laddu's quite often. Me and hubby will be guessing the ingredients in the laddu one be one. We both love this laddu a lot. As it is not very much available in Chennai, i thought of making these healthy laddus for this diwali.

dry fruits laddu

Wednesday, May 15, 2013

sweet potato halwa ~ shakarkandi sheera

shakarkandi halwa

I have not posted any sweet recipes after diwali. When i was going thru gujarati cuisine, i came across this halwa and also found some sweet potatoes in my kitchen waiting to be cooked. so here you see this easy halwa that i made today in minutes!

sakkaravalli kizhangu halwa


                                                                 Sweet Potato Halwa
serves- 4
preparation and cooking time: 30-35 minutes

 Ingredients:

Sweet Potatoes - 250 gms
Ghee - 3 tbsp
Sugar - 6 tbsp
Milk - 5 tbsp
Saffron - 4 strands

To Garnish:

Ghee - 1 tsp
Cashew nuts - 4
Almond - 2
Dry Grapes - 1 tsp

Method:

Soak the saffron in luke warm milk for about 15-20 minutes.

Scrub and wash the sweet potatoes in running water. Peel it's skin and chop then into pieces. Transfer the chopped sweet potatoes into a bowl, which has to be kept in pressure cooker for pressure cooking. pressure cook up to 3 or 4 whistles. let the steam escape and let the sweet potatoes to cool and then mash the sweet potatoes finely.

Heat ghee in a thick bottomed pan, add the mashed sweet potatoes and cook the sweet potatoes in medium flame for upto 1 or 2 minutes. once the ghee gets absorbed, add sugar and mix well. Then add milk(at room temperature) to the pan and mix well. now cook the halwa in slow flame for about 5-7 minutes, till the halwa turns thick and comes together to the centre of the pan.

Heat a small tadka pan, add ghee, roast the nut's, raisins and garnish the halwa.

Serve warm!
sweet potato halwa


Notes:

After pressure cooking the sweet potatoes, taste it and decide on how much sugar to add, depending on the sweetness of potatoes.


Friday, November 9, 2012

Khoya Gulab Jamun

Choosing ready made gulab jamun mix and making jamuns are easy now a days. but making gulab jamun from scratch gives great satisfaction and we know how pure and good it is, when we make at home. also the texture and taste should beg with the popular ready made gulab jamun mixes. i have decided early, that this diwali i should be preparing khoya jamun and also i know i will be following cilantro's recipe! it turned out perfect and its a flawless recipe, so do try this khoya gulab jamun and enjoy this diwali! friends and family tasted the jamuns and it won everyone's heart! those who tasted, asked the recipe for it. so it proves!


Thursday, November 8, 2012

How to make Khoya at home


Homemade khoya

I longed for it for nearly four years, i prayed for it to come to my hands, i was torturing my friends about how i badly wanted it. whenever i am alone at home, i googled and read about it. whenever i saw it on some strangers hand, my eyes looked at it curiously. i hear you saying enough..okay, My Hubby and my dear Son gifted (fulfilled) me the Canon Rebel T3i dslr camera. oh, you still have to wait for me to explore my new love and then we shall bring you the magic here soon. 

homemade mawa

Khoya is unsweetened khova / paal khova. it is also known as Mawa. i wanted to prepare gulab jamun from scratch for this diwali, as my son is going crazy over gulab jamun. so today i prepared khoya spending nearly 2 hours in the kitchen. Tomorrow i will post how i made gulab jamun with khoya.

Khoya is just simmering the milk for hours, with stirring occasionally in the start and constant stirring towards end. i guess the recipe for khoya is over in the line before!

Total cooking time: 2 hours
yields 1 cup of khoya(200 gms)

Ingredients:

Full fat milk - 1 and half ltrs.

Method:

In a wide thick bottomed pan, pour the milk and let it boil. then simmer it for about 1 hour so that the milk gets thick and reduced into half. then bring the flame back on high and keep stirring every two minutes, so that the khoya do not stick to the bottom of the pan. even if it sticks, do not scrap hardly as it may ruin the beautiful khoya.

khoya1


When you see the the khoya (some where looking like thick curdled milk) turn the flame to low and start stirring.  nearly towards the 2nd hour from start, the khoya gets thickening. keep stirring softly, so that it do not stick to the bottom.

khoya2


Sometimes, the khoya may not thicken up, add 1 or 2 tsp of milk powder, for the khoya to get thick. the khoya should be soft and spongy at the end.

Notes:

Use a wide and thick bottomed pan, so that the milk do not overflow.

if you want to have sweet khova, add 1/2 cup sugar when the milk had reduced to about half a litre. the other procedures are all same.

Sometimes, the khoya may not thicken up, add 1 or 2 tsp of milk powder, for the khoya to get thick. the khoya should be soft and spongy at the end.

Friday, August 3, 2012

Rice payasam with condensed milk

Rice payasam also known as paal payasam or milk kheer is made with milk and basmati rice as main ingredients. Slow cooking the rice along with milk and sugar for about 1 hour is the traditional way of making the payasam. I was desperate in using the condensed milk, which i had sitting in my fridge. adding condensed milk gave a tasty, thick consistency payasam quickly.


Monday, October 24, 2011

How to make Laddu

Laddu, iam not a big fan for it. but i tell you, its so fun to make and it will be enjoyed by the kids and family. My kid calls it as chotta bheem laddu. My son, just 4 and half year old, kissed my hands and told,"Thank You Amma, for making these chotta bheem laddu!". i was completely flattered on hearing that. i never thanked my mom, whenever she prepared my favourites, but these kids know very well, how to appreciate. Hubby, whenever picking up these laddus, shouts, "kanna laddu thinna aasaiyya" to my son. Iam glad that i made these laddu's for this diwali.


Laddu is one of easiest traditional sweet to make. The trick is on besan flour mixed with water. it should not be thick or watery. it should be like our dosa batter. if this is kept in mind, every other things make you way for perfect laddu. also keep washing the boondi karandi after every batch and wipe it dry with a clean cloth before starting every batch of boondi's. this will make all boondis look even.


check my video of making Boondhi Laddu.

important tip i learned: Laddu's cannot be shaped, when boondi is so hot. leave it to cool down, when the boondi mixture is just warm, start making laddu's. its so easy to shape laddu's.

i referred cilantro and jeyashri's kitchen for making these laddu.


How to make Laddu

Prep Time10 mins 
Cooking Time: 40 mins  
Serves10
Recipe CuisineIndian
Recipe TypeSweets

Ingredients:

Besan flour /  Kadalai maavu - 1 cup (8 oz)
Cooking soda - a pinch
Water - 1/2 cup (more or less)
Oil - about 2 cup's ( for deep frying boondi's)

For Sugar Syrup

Sugar -  1 cup
Water - 1/2 cup

To fry and add to the boondi mixture:

Ghee - 2 spoons (1 and half Tbs)
Cashews - 2 tsp's (broken)
Raisins - 1 tsp
Sugar Candy / kalkandu - 1 tsp (with 1/2 tsp crushed)
Clove / lavang - 1/2 tsp
Cardamom - 2 (crushed)
Pachai karpooram - a pinch (though i did not add)


Method:

1. Get ready with boondi ladle and other ladle's  as shown in the pic below. also have a strainer, to strain the oil from deep fried boondi. (you can also strain the boondis in a kitchen paper towel).

have a dry clean cloth for wiping the boondi ladle after every batch.


2. Heat Oil for deep frying boondi's in a wide pan, so that the frequency of making boondis will become less and make more boondi's in every single batch.

3. Simultaneously to prepare sugar syrup, in a pan, add 1 cup of sugar and 1/2  cup of water. when the sugar syrup boils, switch the flame to medium. check for single string consistency. you will get it in 5-6 minutes. the sugar syrup will be like honey. you can check single string, by  swiping little syrup on your index finger, rub it on thumb and slowly stretch, when you get single string consistency switch off the flame and close the syrup with a lid.

4. Sieve Besan flour and cooking soda together. add water and mix it thoroughly without any lumps. see to that the besan flour and water mixed to correct consistency. it should be like our dosa batter. you can check by pouring a little batter over the boondi karandi and see the boondi's are easily falling out or not. if its not ease, mix little water.


5. Take a laddle full of besan flour mix and pour over the boondi karandi placed little above the heated oil pan. see the boondi's falliing out. Fry the Boondi's exactly for 1 minute. i left the boondi's in high flame for 1/2 minute and in low flame for another 1/2 minute. remove the boondi's to a strainer.

6. Wash the boondi laddle and wipe it clean and dry and start the next batch. dont fry the boondi till they turn golden colour, we dont want crispy boondi for sweet boondi.


7. On finishing making boondi's, add the strained boondi's to warm sugar syrup and mix well.

8. Heat a small pan, add ghee and fry cashews, raisins, cloves and add to the boondi mixed with sugar syrup.

9. Add crushed cardamom and 1/2 tsp of crushed sweet rock candy(kalkandu) & 1/2 tsp uncrushed. mix all together with the boondi mixture.

10. Heat the whole Boondi mixture in the pan in slow flame, so that if  sugar crystalised melts down. just half a minute on slow flame will do. add ghee(1/2 tsp) to the mixture and close the pan with a lid.

11. Let the boondi mixture sit in the pan for 10 minutes. the whole mixture should be warm, when you are starting to shape laddu's. (just shape it, its so easy)


12. Give the laddu's a standing time of about 1 hour, so that it binds up well. store the laddu's in an air-tight container. it keeps well for about a week and more.


Notes:

Few laddu recipes ask to powder little amount of boondi and mix with boondi mixture before shaping laddu's. my boondi's were not crushable, as they were semi-cooked(thats how it should be).

Don't increase the sugar, just follow 1:1 ratio for sugar and besan flour. this yields perfect laddu's and the sugar level is very much enough.

Adding Ghee, helps the laddu to bind, so its must to add the right amount of ghee.

Using a good quality of Gram flour(besan flour) is also important. when i tried two batches, i used two different besan flours which showed difference in boondi's.

Sweet Boondi

I have never imagined that i will be making laddu at home. Iam flying high that i have learned a traditional sweet with ease. For the past week, i was trying few traditional sweets, so laddu also became a part of my experiment. i kept asking my friends for boondhi karandi(perforated laddle) & one of our friend Anitha got her MIL's boondi karandi for me. that was a sweet gesture from her. Thanks Dear! 


Thursday, October 20, 2011

Kaju Pista Roll Recipe with Video | Diwali Recipes

Kaju Pista Roll, I should have made this as soon as i made my kaju katli. I dragged for two years and yesterday i finally made it. If you are going to try kaju katli, reserve some and try these rolls and other designed sweets, which i will be posting next. I referred Sanjeev Kapoor to get idea over pista filling.


Monday, October 17, 2011

Badam Halwa | Diwali Sweets

Badam Halwa brings more and more beautiful memories from past. My ammumma is an expert in making these delicious badam halwa. She always prepares for my birthdays. whenever she prepares, i used to be on her side observing what she does without talking. Both my ammumma and my avva(great grand mom) wont allow me to talk while they make sweets. that way they put all their attention into it. Yes now i also expect the same and its very important to be so cautious every minute while making this halwa.


Wednesday, June 29, 2011

Mango Phirni ~ Aam Phirni

Mango Season is almost getting over. Along with Mangoes, memories related to mango also makes the season special to me.  Eating Mangoes along with my Grandparents and going back to school after lunch with mango juice strains on uniform. I will be guarding the mango tree at my grandparents house during season. as childrens passing by will throw stones to get mangoes. also we save mangoes from monkeys with a big stick. iam very much missing my childhood days rather than mangoes..

Mango Phirni

Monday, January 10, 2011

Gajar Ka Halwa

Kajar ka halwa

One of our Friend Anitha used to tell about Delhi Carrot and the halwa she makes with it. When i found some Delhi Carrots from street vendors in Tnagar, i could'nt stop me buying 1/2 kg. i repeatedly questioned the selling lady, whether this is carrot or radish. only after her confirmation i bought it. those carrots were in the colour of pinkish red. they are so lengthy too. i reserved the carrots for the weekend dessert.

Delhi Carrot

Unfortunately, i did'nt have ghee on hand, but thats for good. This halwa came out beautifully and tasted Great without Ghee. if you dont believe me, do try it without ghee and find out. Even i did'nt add milk to this halwa. indeed it tasted Good. enough of me raving about my own creation.

Delhi Carrot Grated

This is such a simple recipe with just three ingredients. 1/2 Kg of carrots could make only for two / three servings of carrot halwa.

Ingredients:
(Recipe for two dessert lovers)

Delhi Carrots                                                                                          1/2 kg.
line
Sugar                                                                                                      1/4 cup
line
Roasted Cashews                                                                                          5
line


Delhi Carrot Halwa

Method:

Grate the Carrots finely.

Heat a Skillet or Pan, roast the cashews and keep aside.

In the same pan, add the grated carrots and roast them for a minute.

Add 1/4 cup of sugar to the pan and give a stir.  the sugar melts and the carrot has to be cooked in it.

Keep stirring in between for 8 - 10 minutes, till the water content is fully absorbed and the halwa comes together to the centre of the pan without sticking to the sides of the pan. Add roasted cashews and serve warm.


Gajar ka Halwa

Note: Use Delhi carrots for this vibrant colour. i did not use any food colour for this halwa. nor i did'nt do any photoshop works, to show this halwa bright!

Low fat Gajar ka halwa

Serve the Halwa warm with a scoop of ice-cream.

* You can reduce sugar and add sweetened Khoa towards the end to make it rich.
* You can add Ghee, to make the halwa Fat-rich.
* You can add cashews, pista's at the end to make the halwa cholestrol-rich.

Tuesday, June 1, 2010

Kaju Sweets

Badam Halwa is my favourite Sweet and my ammamma, prepares it excellently. She always prepares it for my Birthdays. and as a follower of her, i made Kaju Sweets for my Son's Birthday Party. It turned out with Great Taste, and my guests enjoyed the Kaju Sweet very much.

Kaju Sweets

Coming to the Recipe..

Ingredients:

(Yields 30 very small pieces / 18 medium sized pieces)

1. Cashews -  2 cup (300 gms)
2. Sugar - 1 cup
3. Water - just to the level of sugar immerses (1/4 cup water)
4. Ghee - to Grease your Palms.
5. I used 3 Colours, (i) Kesari Colour (ii) Lemon Yellow Colour (iii) Orange Red Colour
6. Few Cashew's and Almonds to decorate.

- Wash and dry your mixer, without any wet.
- Grind the Cashew to the powder form.

The Ratio between Cashew Powder and Sugar is 2 : 1.

How to Make Sugar Syrup for Kaju Sweets?

Take One cup of sugar in a thick bottomed pan, and pour water till it get immersed (1/4 cup of water). keep checking every half minute after the sugar syrup starts to boil. it may take 5 or more mins in medium flame to attain single thread consistency.

When the syrup attains the single thread consistency, put the cashew powder to the syrup and keep stirring it to avoid lumps. even break the lumps if any formed.

Keep the flame Low and keep stirring for at least 3-4 minutes.

(For Good Quality Cashews, it takes less time like 4 minutes., but for ordinary Cashews, it takes atleast 10-15 minutes of stirring)

All the cashew dough would come together to the center of the pan without sticking to the bottom of the pan. this is the stage to remove the pan from flame.

Remove the pan from flame and let it cool for about 10 to 15 minutes and till your palms could bear the heat for kneading.

Grease some ghee on your palms and knead the cashew dough for about a minute or 2, till they all come out to a big ball shape. (Kaju Dough is ready) - Refer here to make Kaju Roll.

Divide the Cashew dough into 3 parts and add 3 different colours to each part of the cashew dough. mix the colours well with the dough. and roll into small balls with your ghee greased palm's. (just as we make balls from chapathi dough).

Colourfull Kaju Sweets

Cut the Almonds and Cashews into small pieces and insert into the centre of the Kaju Sweet Balls so that they get flattened a little.


Saturday, November 14, 2009

Eggless Pumpkin Chocolate Chip Muffins

After getting my muffin tray's, can anything stop me from trying muffins in the new tray? Iam glad that i tried Pumpkin muffins, as i easily prepared it by combining the wet and dry mix. The end result's were much appreciable. I did not feel, that i missed egg as it was fluffy or i could not spot the Pumpkin flavour in spite of using fresh home-made Pumpkin Puree. The spice i prepared for this was extra-ordinary. it filled my home with flavours of cardamon and Nutmeg.

Eggless Pumpkin Chocolate Chip Muffins

First I Prepared the Pumpkin Puree and left it in fridge overnight. Remove the Puree from fridge, just before 15 minutes for preparing muffin mix.

The Spice Mix I prepared had

1. Dry Ginger - 3'inch size (I know its more, but its good)

2. Black Cardamon - 1

3. Green Cardamon - 2

4. Cinnamon - 2'inch round stick

5. Nutmeg - 1/4 (of small nutmeg)

6. Cloves - 3

Grinded the above into a powder and sieved to separate the Ginger's nerves.

* Do not add more Nutmeg, even while preparing in more quantity.

i decided to bake the muffins without egg and butter. am sure, not due to calorie conscious, bcoz i did not have egg's and i wanted to use olive oil substituting butter, to find what difference it makes in taste. I added 2 tbsp's of yogurt at last to get the pouring consistency.

Wet Ingredients:

Pumpkin Puree - 100ml

Olive Oil - 50 ml

Yogurt - 2tbsp's


Dry Ingredients:

All Purpose Flour / Maida - 175gms

Powdered Sugar - 1/4 cup

Baking Powder - 1/2 tsp

Baking Soda - 1/2 tsp

Salt - a pinch

Spice Mix - 2 tbsp's

Chocolate Chips - 5 tbsp's


Method:


Mix the Pumpkin Puree well with Olive oil. keep aside.

Sift the flour with salt, baking powder and baking soda. sift at least twice.

Mix Powdered sugar and spice mix and chocolate chips with the flour.

Add the Wet Ingredients (Pumpkin Puree + Oil) to the flour and mix it wooden spoon.

Add Yogurt to get the spooning consistency of batter to muffin cup's.

Grease the muffin cup with oil and spoon in the batter.

I topped it with some chocolate chips and nuts and some museli.

Pre-Heat the oven at 180C. for about 10 mins.

Bake at 170C for about 35 mins. check whether muffins are cooked and bake it furthur if not cooked.

Cool them and serve with cream on top.

Pumpkin Chocolate Chip Muffin

People at home enjoyed Pumpkin Muffin's and they liked it more than my Pumpkin Pie.
I tried Banana Muffins the same way, but it did'nt turn out well as it was sticky and not fluffy as Pumpkin Muffins. somehow Pumpkin did a magic to these muffin's.

Monday, November 9, 2009

Pumpkin Pie - My First Pie

You can look forward for few more-first attempt's here in this winter. Iam very much interested in baking, but could'nt spare time in finding exact recipe. I feel this is one sort of research work. so here i am documenting my first attempt's. Give your verdicts, I really appreciate your suggestions to bake better next time.

Pumpkin Pie Slice

You Bloggers across the sea tempt me a lot with your baking ventures. I thought that i could never find baking tray's / tart pan's / muffin tray's all in Chennai. But Arundathi was kind enough to share in her blog about currim bhoys in adyar and Nirmala has asked me to visit amma nana, for all the above mentioned pan's and trays. I visited currim bhoys, the shop is filled with lovely dinner sets and glasses, I picked few pans, i would have picked half of the shop, if something called money was with me. This Poor Girl is planning to visit monthly such shops with her monthly savings. Man Proposes - God Disposes (Dont Forget Lavi!!)

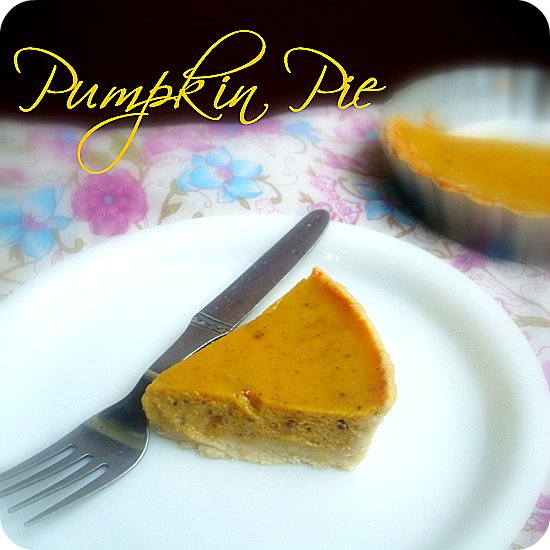
Coming to the Pie, I baked it with less tension. I was almost sure that it will turn up pretty good with some blind confidence, and i should say it got baked perfect and tasted so Great too. I did not have any idea of getting heavy cream for whipping cream to add it for pie filling, so ended up in adding full cream. any chennai bloggers reading this, suggest me where can i get heavy cream or is any way to prepare that at home?

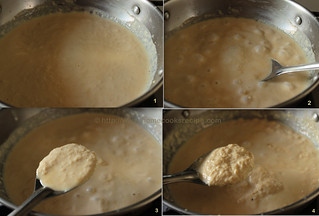
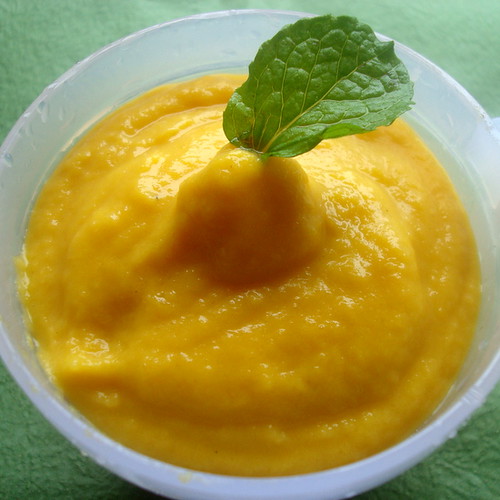
How I Prepared Pumpkin Puree - By Stove Top Method?

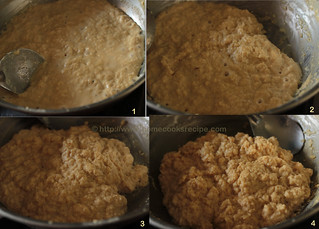
I prepared Fresh Pumpkin Puree at Home. it was so easy to make, i just removed the flesh from skin with some effort and sauted in skillet with some oil till they turned tender. it took some 5 minutes to saute the pumpkin to tender. i cooled them and grinded the pumpkin's into fine puree. i did'nt sieve it. it got a smooth texture. (I bought 0.695 Kg of pumpkin and pureed it) but i used just half of the puree for two pie's.

Home Made Pumpkin Puree

Ingredients for Pie Filling:

Pumpkin Puree - 200gms
Full Cream Milk - 5 tbsp's
Egg's - 2
Cloves - 2
Cardamon - 2
Cinnamon - 1' inch stick
Dry Ginger - 1 'inch
Sugar - 1/4 cup

Assembling Pie Filling:

I grinded the Sugar with cloves, cardamon and cinnamon into powder form. I did not grind them finely, you can see black spots in the pie because of that.

Beat the Egg's.

Add the Powdered Sugar to the egg's beated.

Add Dry Ginger powder to the egg's.

add pumpkin Puree to the egg's.

Now add Whipped Cream to the egg's. i added full cream instead.

Pumpkin Pie Making

Ingredients for Pie Crust:

1. All Purpose Flour - 175 gms
2. Butter (in chilled form) - 5 tbsp's
3. salt - a pinch
4. Powdered Sugar - 1/ 4 cup
5. Ice water - few sprinkles (2 tbsp)

Add salt to the flour and add powdered sugar to the flour and mix well.

Now add the Butter and mix well with the flour. Keep adding butter, till the flour becomes like bread crumbs.

Now sprinkle some ice water to the flour and get the flour togeather into a dough. (like our chapathi dough) don't add ice water more than 2 / 3 tbsp's.

Now flatten the dough and cover it with a plastic cover and put the dough in fridge for overnight or 12 hours.

Get ready with your tart pan. Just before 30 mins to bake the pie, remove the dough from the fridge and let it get back to room temperature.

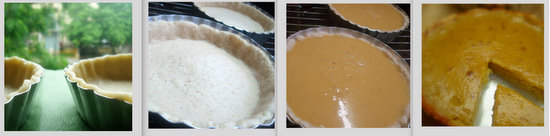
Roll the dough thinly and spread it over the tart pan. trim the exceedings.

after spreading the rolled dough over the tart pan, put the tart pan in the fridge for about 30 minutes.

Bake the Crust in Pre-Heated oven for about 10 minutes at 180C.

Now pour the pie filling into the tart pan.

Bake the Pie for about 45 mins at 160C.

After Baking

Check the pie along the crust, for it got set or not. and bake them furthur. 45 mins will be a correct time.

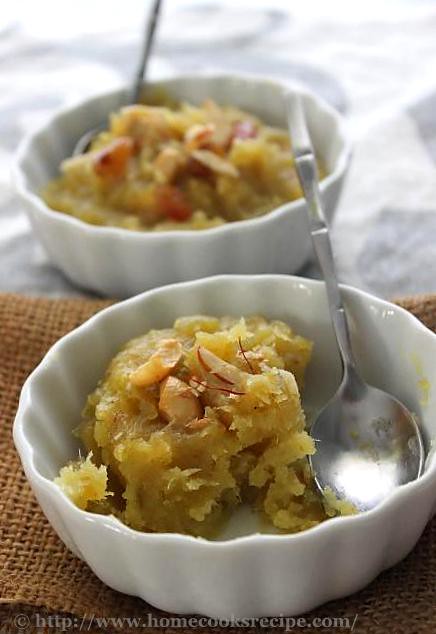
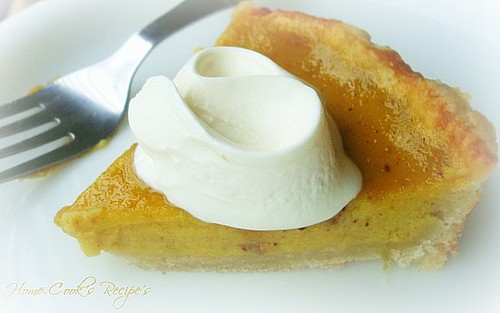
Cool them for few minutes and serve them warm with cream / Honey.

Pumpkin Pie with Cream


It tasted so Great. we all loved it. I liked it in chilled form with cream. Do try this easy pumpkin Pie for Thanks Giving and Enjoy.

Thursday, October 15, 2009

Cashew Roll / Kaju Roll - Easy Diwali Sweet

Thank You all for appreciating my Kaju Katli. It is really worth trying it out so do try for this diwali. Kid's liked my Kaju katli's a lot. Now coming to the colourfull cashew roll, i made this on the same day i made kaju katli's. its just the roll shape of kaju katli's. since i didn't want to overpower you all with many variety on the same day, i thought of dividing the post seperately for Kaju Roll.

Kaju Katli and Kaju Roll

Three Different variety of kaju sweets, with the same basic preparation.


check the video i made on makiing cashew roll to help you
How to Preapare Kaju Roll / Cashew Roll

First Prepare Kaju Katli Dough. then you can shape the dough into rolls or any desired shape.

Ingredients:


1. Cashews -  1 cup (8 oz)
2. Sugar - 1/2 cup
3. Water - just to the level of sugar immerses ( 4tbsp)
4. Ghee - to Grease your Palms.

5. Milk - 2 tsp's
My Cashews were Big in size, when i powdered them i got about 1 cup.

- Wash and dry your mixer, without any wet.
- Grind the Cashew to the powder form.
The Ratio between Cashew Powder and Sugar is 2 : 1

How to Make Sugar Syrup for Kaju Katli?

Take half cup sugar(3 oz.) in a thick bottomed pan, and pour water till it get immersed (say 4 tbsp of water).

Keep checking every half minute..

1. Soon after the sugar water starts to boil, have a little in a spoon and touch it with your fingers. it will be very sticky to your fingers.( pisukku patham)

2. Second stage is, just drop a drop of sugar syrup on a plate, and tilt the plate, sugar syrup will start flowing.

3. Third and required stage for Kaju Katli is

Drop a drop of sugar syrup, on a plate, it should get set and not move, when the plate is tilted. 


When the syrup attains the third stage, put the cashew powder to the syrup and keep stirring it to avoid lumps. even break the lumps if any formed.

Keep the flame Low and keep stirring for at least 3-4 minutes.

When you see bubbles coming and blowing off from the cashew burfi and when you take it with a slotted spoon ( Jalli Karandi ), and tilt the spoon, The cashew burfi should start sliding vertically like paper and flat. switch off the flame and remove from the stove. (just takes 3 - 4 minutes in slow flame, dont exceed this time, if you are a beginner)

Let it cool for about 10 to 15 minutes in tha kadaai / Pan itself. Let it Cool till your palms could bear the heat for kneading.


Grease some ghee on your palms and knead the cashew burfi dough for about a minute or 2, till they all come out to a big ball shape. (Kaju Dough is ready). 


Add 1 or 2 tsp's of milk while kneading, so that the kaju dough gets its elasticity, which we need while making rolls.

Grease your palms and fingers with ghee/butter/oil (for vegan's). Divide the Kaju katli dough into two parts.

Add Kesari Colour / apple green colour / Red Colour to one portion of the kaju katli dough.

Knead the dough well, to make sure the colour spreads evenly.

Grease your palms again.

Now take a small ball of the plain dough and roll it with your rolling pin or flat it with your palms.
How to Make Cashew Roll

Take a small ball of the colored ball and roll it with your both palms to get a cylindrical shape.

Place the Cylindrical shaped colour dough onto the start of the rolled plain dough.

Gently fold and cover the coloured dough completely.

Tap the Roll with your finger on either side of the roll, to make the roll into a shape.

Roll it gently to make them into a proper roll shape.

Trim the edges of the roll, so that the stuffed colour dough is visible.

Yummy Colourfull Kaju Roll is Ready.


Cashew Roll

Are you wondering How i got the line of colour on cashew roll, i just didn't fold the roll completely, thereby i got my favourite beautifull orange colour lines on the roll.

Different Ideas to Try:

The dough is so flexible, and we can try many variety in it.

Try 3 layered roll.
Stuff the roll with nuts.
If you know carving, try to make like an apple.
Prepare Kaju Pista Roll in the same way, with kaju dough and pista dough.

If you prepare once, you will get so many ideas.

Double Colour Cashew Roll

It just took me two hours, including running behind my son and feeding him. if you have an helping hand and ideas, you can blast them with all colours.

Have a Colourfull Fun Filled Sweet Filled Diwali!!
Related Posts Plugin for WordPress, Blogger...